“`html
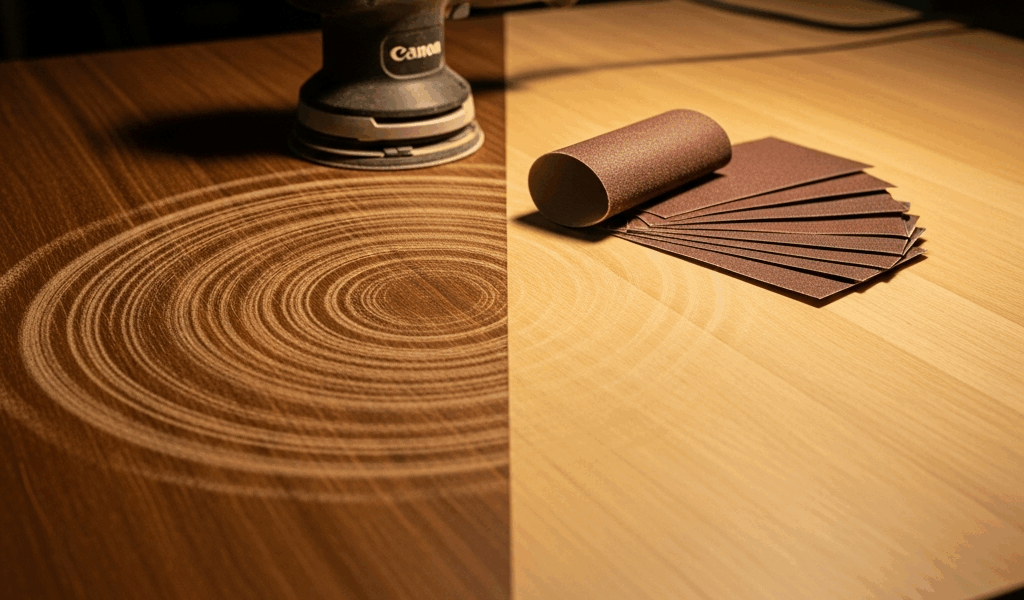
Why Orbital Sanders Leave Swirl Marks
Orbital sander swirl marks on wood surfaces have gotten complicated with all the conflicting advice flying around. I’ve spent way too many hours sanding only to watch stain highlight circular patterns I didn’t even notice during finishing. Here’s what I learned: the problem isn’t the tool—it’s how we use it.
But what is actually happening? In essence, a random orbit sander’s pad moves in a slightly elliptical pattern at high speed, typically between 8,000 and 12,000 orbits per minute. The orbital throw (the diameter of that orbital motion) on most 5-inch sanders sits at roughly 5mm. Every pass leaves a microscopic pattern of overlapping scratches. When you apply stain, those scratches catch pigment differently than the surrounding wood, creating visible swirls. But it’s much more than just physics.
Three culprits work together here. First, starting with too-coarse grit — jumping straight to 80 on hardwood creates deep scratches that subsequent grits can’t fully erase. Second, pressing too hard. I learned this the hard way when I nearly gouged a maple tabletop by leaning my full body weight into the sander. The pad doesn’t need force. Let gravity and the orbital motion do the work instead. Third, using worn or hardened pads amplifies swirls because the bristles lose their cushioning, concentrating pressure on smaller areas.
Softwoods are actually more forgiving than hardwoods here — pine and poplar don’t show swirls as dramatically because the grain is less uniform. Hardwoods like oak, maple, and walnut? They reveal every mistake.
Grit Progression That Eliminates Swirls
The grit sequence I use now prevents swirls before they start: 80 → 120 → 150 → 220. This progression works because each step removes the scratches from the previous grit while leaving progressively finer marks.
I used to skip from 100 straight to 180, which was my biggest mistake honestly. Those jumps are too aggressive. When you jump more than 50 grit numbers, the coarser scratches don’t get fully abraded away — they just get sanded over. Stain finds those valleys and settles in them.
Starting with 80-grit on hardwoods removes old finishes and rough spots efficiently. Spend maybe 3–5 minutes per square foot here, working with the grain direction when possible, though orbital sanders are forgiving on grain since they move in random directions. The goal isn’t perfection — it’s removing surface impurities.
At 120-grit, you’re halfway through. Most swirl damage gets erased here if you did 80 properly. Spend 2–3 minutes per square foot. You’ll see the wood start looking more uniform. Don’t skip this step thinking 150 will handle it alone — it won’t.
150-grit is the bridge. Two minutes per square foot gets you smooth enough that 220 can deliver the final polish. This is where I notice the swirls starting to disappear completely.
220-grit is your last power-sanding step. Light, slow passes — one minute per square foot max. You’re not removing wood here; you’re erasing the 150-grit marks. This determines what stain will actually see.
For softwoods like pine, you can sometimes condense this to 100 → 150 → 220 and skip the middle step. They sand faster and don’t hold scratches as long. Hardwoods need that extra 120-grit stage though.
Orbital Sander Speed and Pressure Technique
Speed settings matter, but not how most people think. A 5-inch random orbit sander typically runs at 10,000–12,000 OPM (orbits per minute). A 6-inch model usually maxes out around 4,500–5,000 OPM because the larger diameter means more travel at the pad edge.
Here’s the practical truth: Don’t max out your speed on coarse grits. Run 80-grit at 60–70% of maximum RPM. This sounds counterintuitive, but slower speeds on aggressive grits mean less aggressive scoring. You get better control and fewer deep scratches.
By 150-grit, run full speed. The finer abrasive isn’t cutting as deep anyway. At 220? Full speed is fine — you’re polishing, not carving.
Pressure is where I see the most mistakes happen. You should barely feel resistance. Let the sander’s weight do most of the work. I use maybe 2–3 pounds of hand pressure on a 5-inch sander. If your arm gets tired in five minutes, you’re pressing too hard. Your results will show swirls because you’re flattening the pad against the wood, creating localized pressure points.
Spend 2–3 minutes per square foot on each grit. Rushing means incomplete coverage. Some spots get extra passes while others barely get touched, creating uneven scratch patterns.
Pad wear affects swirl visibility dramatically too. A brand-new pad cuts cleanly. After 50–60 square feet of sanding, the hook-and-loop surface hardens slightly, and cushioning decreases. This concentrates your orbital motion into fewer contact points, which actually amplifies swirls. Replace pads every 80–100 square feet on fine grits; coarser grits can go longer without replacement.
Pad Type and Condition Matter More Than You Think
Not all random orbit sander pads are equal. The backing pad itself — the hard disc that holds the sandpaper — comes in soft, medium, and hard compounds. Most people grab whatever’s cheapest, which is usually a harder backing. Big mistake.
A soft or medium backing pad conforms slightly to wood surface variations and distributes pressure more evenly. Hard backings amplify pressure points, which creates more swirls. I learned this when I switched to a soft backing pad on my DeWalt DWE6423 — it uses 5-inch hook-and-loop — and the difference was immediately obvious.
Hook-and-loop pads are essential. Self-adhesive sandpaper is tempting cost-wise, but it doesn’t release cleanly and degrades faster. Expect to pay $8–15 per quality hook-and-loop disc versus $2–3 for cheap adhesive sheets. The quality difference justifies the cost because cheap pads wear unevenly, creating dead zones where swirls form.
When replacing pads, inspect the backing surface. If it’s shiny, hardened, or has visible glazing, the pad is done — even if the sandpaper itself seems fine. That hardening is what causes amplified swirls on final grits.
For a typical dining table, you’ll use roughly 8–12 discs going through the full progression. Budget maybe $80–120 for pads alone. Sounds expensive until you realize a ruined finish costs $200+ in materials and days of rework.
Final Check Before Stain and Finish
Hand-sanding with 320-grit or higher is your final defense. Probably should have opened with this section, honestly. Use a sanding block with 320 or 400-grit paper, sanding parallel to the grain for 30–60 seconds per square foot. This catches any remaining orbital scratches that stain will reveal.
Wipe the wood with a tack cloth or damp rag to see what you’re actually dealing with. Wet wood reveals swirls more clearly because the moisture highlights surface inconsistencies. Look at oblique angles with side lighting — that’s where swirls become obvious. If you see circular patterns, you’ve got a grit progression issue, and backing up to 150-grit is necessary before moving forward.
Apply stain to a test area on the underside or a scrap piece matching the same wood type. Let it dry completely. If swirls appear in the test, the issue is pre-finish sanding, not the stain itself. Go back and re-sand with 220 on the problem areas, then 320 hand-sanding, then retest before tackling the whole piece.
One visual trick: spray the sanded surface with water. Swirls show up as slightly raised or depressed lines that the water highlights. This is your final quality check before any finish touches the wood.
That’s what makes this technique endearing to woodworkers — orbital sander swirl marks stop when you respect the grit progression, control pressure and speed, maintain pad quality, and always hand-sand before finishing. It’s not magic. Just patience and technique working together.
“`


Stay in the loop
Get the latest the home woodshop updates delivered to your inbox.