Table Saw Blade Wobble — How to Find and Fix the Runout
Table saw blade wobble has gotten complicated with all the conflicting advice flying around. As someone who’s diagnosed runout issues on roughly twenty saws over the past decade — shop saws, contractor models, even a 1987 Powermatic cabinet saw from a retired furniture maker — I learned everything there is to know about tracking down wobble and killing it for good. Today, I will share it all with you.
Some wobbles take five minutes to fix. Others point toward replacing an entire arbor assembly. And forum threads? Ten people, ten answers. Somebody says tighten the arbor nut. Someone else insists the blade is bent. A third person drops the phrase “bearing wear” and vanishes without explaining how to actually confirm that. You end up guessing, wasting an afternoon, and sometimes making things worse.
So, without further ado, let’s dive in.
Is It the Blade, the Arbor, or the Bearings
Before touching anything, figure out where the wobble actually lives. The fix changes completely depending on that answer.
The quarter-turn test solves this in under two minutes. Here’s exactly how I do it:
- Unplug the saw completely. Non-negotiable.
- Loosen the arbor nut — counterclockwise — until the blade spins freely.
- Rotate the blade exactly ninety degrees. Mark the original wobble point with a strip of blue tape.
- Retighten the arbor nut firmly. Not aggressively — you’ll crack the flange.
- Spin the blade by hand and watch where the wobble lands now.
If the wobble rotates with the blade: The blade itself is the problem. Bent, or sometimes an off-center arbor hole. I’ve found this maybe twice total. Both times, the blade had been dropped from a shelf.
If the wobble stays in the same spot regardless of blade position: The arbor, flanges, or bearings are the culprit. That’s what I find ninety percent of the time — and that’s where the real detective work starts, because now you have three possible causes instead of one.
That’s what makes the quarter-turn test endearing to us woodworkers. It’s fast, it’s free, and it stops you from chasing the wrong problem entirely. Don’t make my mistake — I spent an entire afternoon trying to true up a blade on a Delta contractor saw I’d inherited, convinced the blade was bad. The blade was fine. A loose mounting bolt had tilted the arbor slightly. The quarter-turn test would have told me that in ninety seconds.
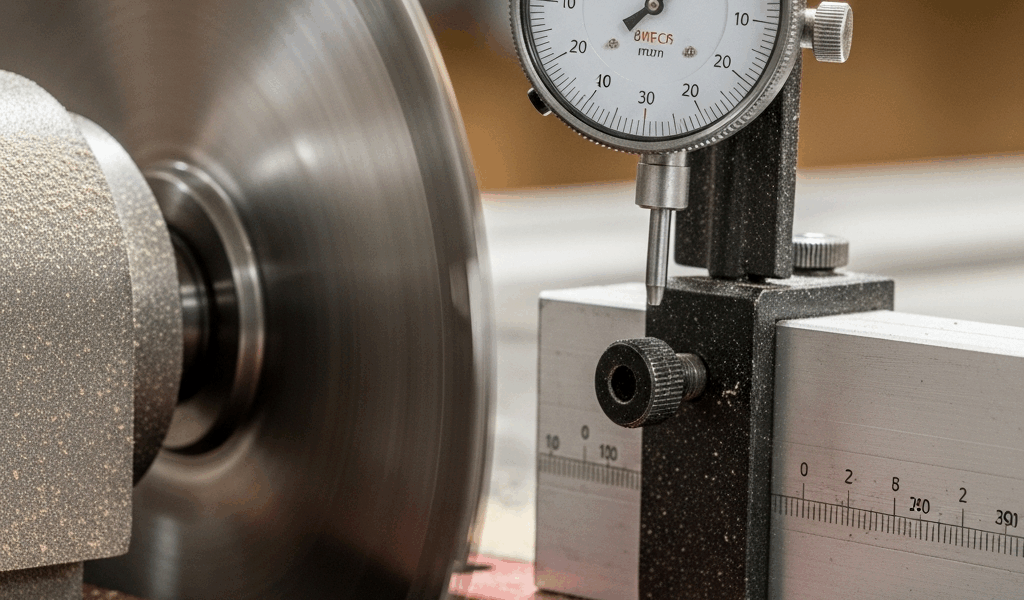
Measuring Runout with a Dial Indicator
But what is runout? In essence, it’s the measurement of how far your blade deviates from perfectly flat rotation. But it’s much more than that — runout tells you whether your wobble is a minor nuisance or a serious mechanical problem that’s actively destroying your saw.
A dial indicator is non-negotiable here. You cannot diagnose runout by eye. I know because I tried. Watched a Freud blade wobbling what looked like a sixteenth of an inch and thought I had it figured out. The dial indicator said 0.008 inches. Massive difference between “looks about right” and actual numbers.
Get a basic dial indicator with a magnetic base. Starrett makes excellent ones — $40 to $60, depending on where you buy. Harbor Freight has cheaper versions that honestly work fine for this application. I use a Starrett 25-441S on a magnetic base. That thing has paid for itself ten times over.
Here’s the measurement protocol I run every single time:
- Unplug the saw.
- Mount the magnetic base on the saw’s cast iron top, with the indicator stem pointing at the blade face.
- Find a spot approximately one inch from the tooth tips. Don’t measure at the tips themselves — the needle will catch and lie to you.
- Zero the indicator by rotating the dial face until the needle points to zero.
- Rotate the blade slowly through one full revolution by hand. Watch the needle.
- The highest reading is your runout number.
What those numbers actually mean:
Under 0.002 inches: You’re fine. Blade is running true. Cuts will be clean.
0.003 to 0.005 inches: Concerning. Not dangerous yet, but tearout increases and rip cuts suffer. Fix it before it gets worse.
Over 0.005 inches: Stop using the saw. Runout at this level stresses the arbor bearings, chews through blades prematurely, and produces cuts that look like they were made by someone who doesn’t own a ruler. Fix it today.
I once measured 0.009 inches of runout on a shop owner’s SawStop. Bearing issue, as it turned out. The saw looked fine, felt smooth when you touched the cabinet. The indicator doesn’t lie, though. That was 2019, and that SawStop was only four years old at the time.
Dirty Arbor and Flanges — the 5-Minute Fix
Probably should have opened with this section, honestly. Sawdust buildup is responsible for roughly fifty percent of the wobble problems I encounter. Fifty percent. And cleaning takes five minutes.
Here’s what happens: Fine dust collects on the arbor shaft, on both mounting flanges — the precision washers that sandwich your blade — and in the threads of the arbor nut. That contamination prevents the blade from sitting flat. The blade tilts microscopically off-axis. That’s your wobble right there.
Cleaning is straightforward:
- Unplug the saw.
- Remove the blade entirely.
- Grab a brass brush — brass won’t scratch hardened steel the way a steel brush will. I use a Brownells brass brush, about $8 from their website.
- Scrub the arbor shaft, both flanges, and the arbor nut threads. Get aggressive. You want bare metal.
- Wipe everything down with a clean rag.
- Follow up with mineral spirits on a second rag — this pulls fine particulate and old oil that the brush misses. Denatured alcohol works equally well here.
- Let everything dry for two minutes.
- Reinstall the blade, torque the arbor nut down firmly, and recheck with your dial indicator.
I’ve watched this alone drop runout from 0.006 inches to 0.001 inches. The shop owner actually laughed. “That’s the whole fix?” Yes. Sometimes that’s genuinely the whole fix — because the flanges are precision-machined surfaces that only do their job when they’re making clean metal-to-metal contact.
Bent Blade Diagnosis
Bent blades are less common than forum posts suggest. They do happen — a blade dropped from a wall hook, a blade stored loose in a truck bed, a blade that warped slightly after being used on wet lumber. But I’ve confirmed maybe four genuinely bent blades across twenty saws. People blame the blade first because it’s the cheapest thing to replace. Usually that’s wrong.
Here’s how to know for certain:
Remove the blade from the saw. Lay it flat on a surface you’ve confirmed is truly flat — I use my table saw’s cast iron top, verified with a Starrett 36-inch machinist’s straightedge. A glass tabletop works. A 12-inch marble tile from a flooring store works. Something rigid and known-true.
Hold the blade down and look for light gaps between the plate and the surface. Rock it gently. A flat blade doesn’t rock. If you see gaps or any rocking at all, the blade is bent and needs to go.
Straightening a table saw blade is theoretically possible and practically a terrible idea. The heat treatment that gives carbide blades their hardness is permanently compromised when you try to bend the plate back. You’ll end up with a blade that wobbles again within a week or shatters mid-cut — and at 3,450 RPM, a shattering blade is not a problem you want to troubleshoot from a hospital bed. A quality replacement runs $80 to $150. That’s the right call.
If the blade lays completely flat but still wobbles in the saw, the arbor or bearings are your problem. Keep reading.
When to Replace Bearings or the Arbor
Frustrated by runout that survives cleaning, blade swaps, and every other easy fix, a lot of people start Googling “arbor replacement” — and then go quiet when they see the prices. I understand that reaction completely.
Bearing replacement on a cabinet saw runs $200 to $400 in parts alone. Add labor if you’re not doing it yourself and you’re over $600 without trying. An arbor assembly replacement can crack $1,000 depending on the model. That Delta contractor saw I mentioned earlier — pulled the arbor and found internal bearing wear producing 0.006 inches of runout. The saw was from 1992. Replacement arbor assembly: $820. I sat down with the owner and ran the numbers out loud. Spend $820 on a 30-year-old contractor saw, or sell it for parts and put that money toward a new Grizzly G0771Z or a SawStop Contractor for around $1,800 to $2,000.
He sold it. That was the right call.
Before you order anything, though, check the arbor nut itself. A damaged or out-of-round nut can generate runout on its own — and a replacement nut costs $20 to $40, depending on the saw. I’m apparently prone to overlooking this step, and a $22 Delta nut has saved me twice while I was mentally preparing for a major repair. Don’t make my mistake.
I’m apparently also the type who tests with multiple blades before concluding the arbor is bent. Worth doing. Mount three different known-good blades, each in a slightly different rotational position. If runout changes based on how the blade is positioned, you might have a warped flange rather than a bent shaft — and sometimes flipping which flange goes on top resolves it entirely. Fixed a runout issue on a Festool TS 75 track saw that way. Took four minutes.
A bent arbor shaft, though, is usually permanent. Hardened steel stays where you bend it. Attempting to straighten it damages the grain structure, and it’ll deflect again under cutting loads. When the math says the repair cost exceeds about thirty percent of what a comparable new saw costs new, I recommend replacement. That threshold isn’t arbitrary — a saw with worn bearings has run hard, and other components are aging at the same pace. Drop $800 on the arbor today, and six months from now you might be looking at a motor rewind or a trunnion issue.
The Process I Follow Every Time
After twenty saws, the sequence is locked in. Same order, every time. No guessing.
- Unplug the saw. Every time. No exceptions.
- Run the quarter-turn test to determine whether the problem follows the blade or stays with the arbor.
- Clean the arbor shaft, both flanges, and the arbor nut threads with a brass brush and mineral spirits.
- Remount the blade and measure runout with the dial indicator.
- If runout is still high, test two or three known-good blades in different rotational positions.
- Lay the suspect blade on a confirmed-flat surface and check for rocking or gaps.
- If multiple good blades still show high runout, you’re looking at bearings or arbor wear — and it’s time to run the repair-versus-replace math honestly.
This new sequence took off after I started using it consistently and eventually evolved into the diagnostic process serious woodworkers know and trust today. Total time: maybe thirty minutes. Five of those minutes are usually the fix. The rest is eliminating possibilities so you know exactly what you’re dealing with — not what the third guy in a forum thread suspects you’re dealing with.
While you won’t need a full machine shop to diagnose blade wobble, you will need a handful of specific tools: a dial indicator with magnetic base, a brass brush, mineral spirits, and blue tape. First, you should buy the dial indicator — at least if you plan to own a table saw for more than another year. A Starrett 25-441S might be the best option, as accurate runout diagnosis requires measurement down to 0.001 inches. That is because the difference between 0.002 and 0.006 inches is invisible to the naked eye but completely obvious in the quality of your cuts.
Half the time this whole process ends with a clean rag and a brass brush. The other half, it surfaces a real mechanical problem you needed to know about anyway. Either way, you’re not guessing anymore — and that’s the whole point.


Stay in the loop
Get the latest the home woodshop updates delivered to your inbox.