What Planer Snipe Actually Is and Why It Happens
Planer snipe has become harder to navigate with all the conflicting advice flying around. But here’s the short version: it’s that shallow gouge — sometimes a groove, sometimes just a ghost of a divot — that shows up at the very start or end of your board. Often both ends. Right where you least want it.
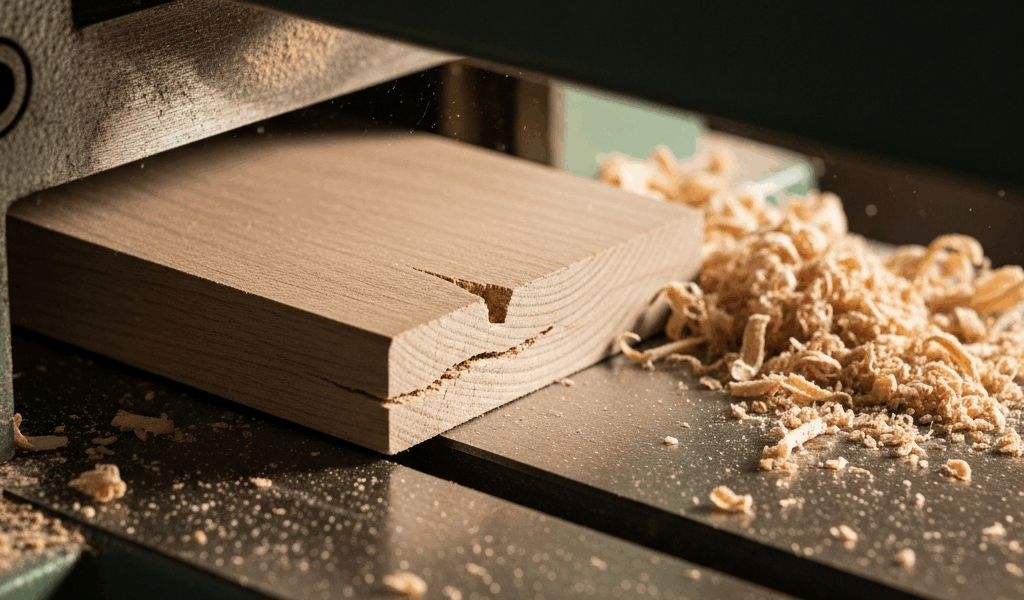
The board goes in clean. Feeds through fine. Then dips on the way out, and the cutterhead takes a bite out of the trailing edge. That’s snipe. That’s the whole thing.
So what’s actually happening mechanically? When one end of a board is hanging in the air while the other end is still engaged with the feed rollers, the board flexes down. Just slightly. But slightly is enough — that dip moves the trailing edge closer to the cutterhead than it’s supposed to be. The blades catch it. Another eighth inch and the board is fully supported again. Too late. Damage is done.
It’s a physics problem. Not a quality problem. Even expensive industrial machines snipe if the setup is wrong. Don’t let anyone tell you otherwise.
The Most Common Causes Worth Checking First
Before touching any adjustment knobs, run through this list. Most snipe problems come from the same four or five places every time.
- Boards under 18 inches long — Short stock barely spans both rollers. One end is basically always unsupported. That’s the whole problem right there.
- Infeed or outfeed tables not level with the bed — Even a few thousandths of misalignment will tip the board as it transitions. You won’t see it happening. You’ll only see the aftermath.
- Roller pressure cranked too tight — This one surprises people. Aggressive roller pressure can actually force the board to flex unnaturally, which makes snipe worse, not better.
- Taking too heavy a cut — Deep cuts amplify everything. The board flexes more, the cutterhead bites harder, and the snipe gets uglier.
Here’s a useful diagnostic: Is the snipe worse on one end than the other? Infeed snipe — at the entrance — usually means table misalignment. Outfeed snipe — at the exit — points to technique or roller pressure. Both ends equally bad? Probably your depth of cut or the board length itself.
How to Fix Snipe Without Buying Anything New
Important part first. You can kill snipe — or nearly kill it — without spending a single dollar. Three techniques. All free.
Use Sacrifice Boards or a Sled
The simplest fix, and the one most shops should just adopt permanently: feed a scrap board into the planer right before your good board. The scrap eats the infeed snipe. Then feed another scrap immediately behind your workpiece — that one absorbs the outfeed snipe.
The sacrifice boards need to be roughly the same thickness as your workpiece. Width matters too, at least close. They don’t need to be pretty — I keep a stack of poplar offcuts around 16 inches long specifically for this. Cost: nothing. They’re scraps.
Some woodworkers take this further and glue a thin strip of hardboard to the leading and trailing edges of the workpiece itself, building a temporary sled. Works especially well for narrow boards. The sled extends the effective support length, so both rollers stay engaged through the whole pass.
Lift the Trailing End as It Exits
This one takes practice. As the board approaches the outfeed roller, gently lift the trailing end with your hand. Not aggressively — you’re not trying to force anything. Just reducing downward pressure by an ounce or two. Enough to keep the board from dipping into the cutterhead zone as it transitions off the infeed support.
Timing is everything here. Lift too early and you lose control of the feed. Lift too late and you’ve already sniped. The sweet spot is roughly when the board is halfway through — front edge already on the outfeed table, back edge not quite there yet.
That’s what makes this technique endearing to us hobbyist woodworkers. It costs nothing and builds real feel for how the machine runs.
Take a Light Final Pass
Run your board through at full working depth first. Then send it through again at 1/32 inch — or even less. That shallow final pass removes most snipe marks without meaningfully changing your final thickness.
This is my go-to move for wider boards where running sacrifice pieces gets awkward. The snipe from the first pass is usually shallow enough that 1/32 of an inch cleans it up entirely. Yes, it takes more time. But for a $300 slab of walnut, that trade-off isn’t even a question.
When Your Planer Setup Is the Real Problem
Sometimes the technique is fine. The planer itself is out of alignment.
Check Table Alignment
Get a reliable straightedge — not the warped one that’s been living at the bottom of your tool bin. A 24-inch Starrett is ideal. An 18-inch aluminum straightedge works too, honestly, as long as it’s actually straight. Lay it across the infeed table, then the outfeed table, then the bed itself. Any light showing between the straightedge and the surface means misalignment.
Most benchtop planers have some table play built in. Dewalt DW735 and most Makita models allow outfeed table adjustment through shim screws or locking handles underneath the table. Check your manual — seriously, actually open it — because the method varies a lot depending on brand and production year.
Shimming a table takes about 20 minutes. Costs nothing if you already have shim stock. If not, a pack of brass shims runs around $8 at any hardware store. Done.
Adjust Roller Pressure
Most benchtop planers have infeed and outfeed roller pressure adjusters. Usually hex screws or set screws — accessible from underneath or the side, depending on the model. Pressure set too tight causes snipe. Counter-intuitive, but consistent.
The test is simple: feed a board through at your current settings. Get snipe? Loosen the pressure screws by a quarter turn and try again. You want just enough grip to feed the board cleanly — not so much that you’re forcing it down into the cutterhead zone.
On the DW735, those are the large Phillips screws accessible from the side. On a Grizzly G0690, they’re underneath and you’ll need to pull the base panel first. Again — your manual or a model-specific YouTube teardown will save you an hour of frustrated searching. Skip past the mistake I made.
How to Account for Snipe When You Cannot Eliminate It
Even with perfect technique and a well-tuned machine, some boards will show minor snipe. Plan for it instead of fighting it.
Mill all rough boards a quarter to a half inch longer than your final dimension. After planing, you crosscut off the sniped ends and you’re done. For a 24-inch final length, start with 24.5 or even 25 inches of rough stock. The extra waste is minimal. The peace of mind is real.
I’m apparently sensitive to surface tearout too — I run a 1/32-inch finishing pass on almost everything, and it works for me while skipping it never seems to end well. That shallow final pass resurfaces the snipe zone lightly and evens out grain tear at the same time. Two problems, one pass.
Snipe is fixable. Usually without spending anything or buying new equipment. Start with technique. Check the tables if technique alone doesn’t solve it. And add a little extra length to your rough stock to cover whatever you can’t prevent. That combination works for nearly every hobbyist planer setup — so, without further ado, go make some sawdust.


Stay in the loop
Get the latest the home woodshop updates delivered to your inbox.