An Introduction to Pocket Holes

Pocket hole joinery has gotten complicated with all the jig options and screw types flying around. As someone who built my first set of kitchen cabinets with nothing but a Kreg jig and a prayer, I learned everything there is to know about pocket holes. Today, I will share it all with you.
At its core, a pocket hole is just an angled hole drilled into one piece of wood so you can drive a screw into a second piece. Dead simple concept. But the results? Surprisingly strong joints that look clean because everything hides on the back side. That’s why DIY furniture builders love them — beginners and old-timers alike.
Understanding the Basics
Here’s the deal. You drill at an angle into your workpiece, then sink a screw through that channel into the mating piece. The angle locks everything together tight. No brackets, no nails, no fussing around with complicated setups. I remember the first time I got one dialed in — I tried to pull the joint apart by hand and couldn’t. That sold me.
Tools of the Trade
Probably should have led with this section, honestly. You need a few things to get rolling:
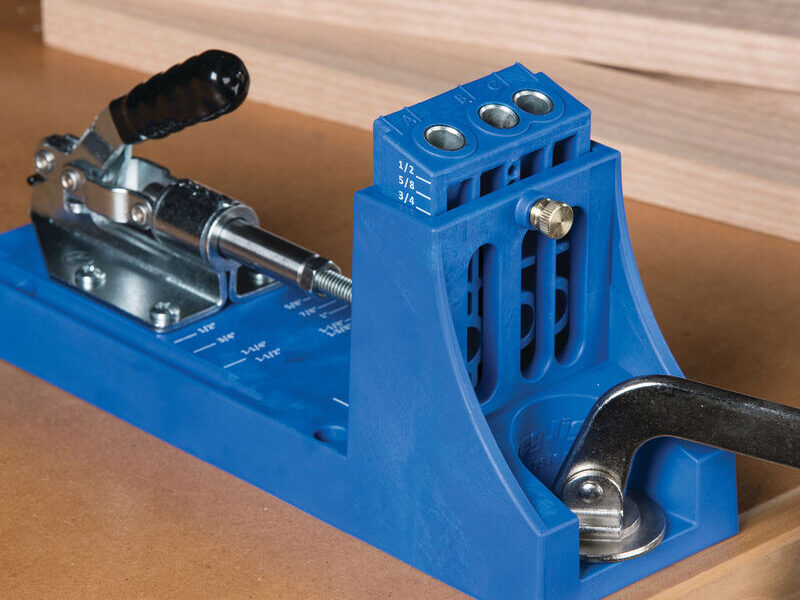
- Pocket Hole Jig: This is your guide. It sets the drill angle so you don’t have to eyeball it. Worth every penny.
- Drill and Drill Bit: You need a stepped bit specifically made for pocket holes. Regular twist bits won’t cut it — literally. The stepped profile bores the pilot hole and the pocket in one pass.
- Pocket Hole Screws: Don’t cheap out here. These have a flat shoulder under the head that prevents splitting. Most are self-tapping, which saves a ton of time during assembly.
- Clamp: Holds the jig and your workpiece steady. Skipping this is how you end up with crooked holes and band-aids on your fingers.
Setting Up Your Workspace
I can’t stress this enough — clean up your bench before you start. A cluttered workspace is where mistakes happen. Get your bench at a height where you’re not hunching over. Make sure the lighting is decent so you can actually see your drill holes. And keep everything you need within arm’s reach. Goggles are non-negotiable. I’ve had wood chips bounce right at my face more times than I’d like to admit.
The Process: Step-by-Step
Alright, let’s walk through it. Grab your jig and set the thickness guide to match your stock. Clamp the wood into the jig nice and snug. Chuck up your stepped bit and drill into the wood until the collar bottoms out on the jig body. That collar is your depth stop — it keeps every hole consistent so you’re not guessing.
Now pair up your pieces. Clamp them together so nothing shifts on you. Drop the screw into the pocket hole and drive it in until it’s snug. Here’s where people mess up: they keep cranking. Don’t do that. Over-tightening strips the hole or pulls the joint out of alignment. Snug is snug. You’ll feel it.
When to Use Pocket Holes
That’s what makes pocket hole joinery endearing to us woodworkers — it works in so many situations without making life harder. Face frames on cabinets? Perfect, because the holes hide behind the frame. Tabletops? Absolutely. All the fastening happens underneath where nobody sees it. Drawer boxes get a real boost in rigidity from pocket screws too. I’ve built drawers that survived years of kids slamming them shut, and the pocket joints held up every time.
Advantages of Pocket Hole Joinery
The biggest win is accessibility. You don’t need years of experience to pull off a solid pocket hole joint. A complete beginner can get reliable results on day one. The mechanical hold is strong enough that you can skip the wood glue in many situations, though I usually add a thin bead anyway for insurance. Speed is the other factor. You can crank out joints fast, which means projects actually get finished instead of sitting in the shop for months.
Addressing Potential Drawbacks
Look, pocket holes aren’t perfect for everything. If the pocket side faces outward on a visible surface, it looks rough. You can plug them with wooden plugs, but it’s extra work. They’re also strongest when the screw enters perpendicular to the grain. Going into end grain weakens things considerably. And if you’re working with really soft wood like cedar or pine, you might get splitting if your screws are too aggressive. In those cases, maybe consider dowels or mortise-and-tenon joints instead.
Innovations in Pocket Hole Tools
The jigs have come a long way from the basic models I started with. Newer ones let you adjust for a wider range of material thicknesses without swapping parts. Some have built-in dust collection ports, which is honestly a game-changer because you can actually see what you’re doing. The drill bits have improved too — better heat resistance means they stay sharp longer and cut cleaner holes. Worth upgrading if you’re still running old equipment.
Common Mistakes to Avoid
Number one mistake: using regular wood screws. They’ll split your workpiece almost every time. Pocket hole screws exist for a reason. Number two: not checking your jig settings before drilling a whole batch. I’ve drilled twenty holes at the wrong depth before noticing. Not fun. And always, always clamp your pieces together before driving screws. Hand-holding doesn’t cut it. Things shift, joints end up crooked, and you’ve wasted wood.
Experimenting with Pocket Holes
Once you’re comfortable with the basics, start pushing the boundaries a bit. Try different species — hardwoods behave differently than softwoods, and learning the feel of each one makes you better. Play with different screw placements and angles for creative joints. Build things beyond basic shelves. Planters, picture frames, outdoor benches — pocket holes handle all of it. Some of my favorite shop projects started as “I wonder if this would work” experiments.
Online and Community Resources
There’s no shortage of help out there. Woodworking forums are goldmines for troubleshooting weird joint problems. YouTube has step-by-step builds for just about anything you can imagine. And local woodworking clubs are underrated — nothing beats getting hands-on advice from someone who’s been doing this for thirty years. Don’t be afraid to ask questions. Every experienced woodworker was a beginner once.
Closing Thoughts on Pocket Holes
Getting good at pocket holes opens up a lot of doors in the shop. It’s one of those skills that just keeps paying off project after project. The more you do it, the faster and more precise you get. Every build teaches you something new. And at the end of the day, you’ve got furniture or fixtures that are genuinely solid and built to last. That’s what keeps me coming back to the workbench.
Recommended Woodworking Tools
HURRICANE 4-Piece Wood Chisel Set – $13.99
CR-V steel beveled edge blades for precision carving.
GREBSTK 4-Piece Wood Chisel Set – $13.98
Sharp bevel edge bench chisels for woodworking.
As an Amazon Associate, we earn from qualifying purchases.


Stay in the loop
Get the latest wildlife research and conservation news delivered to your inbox.