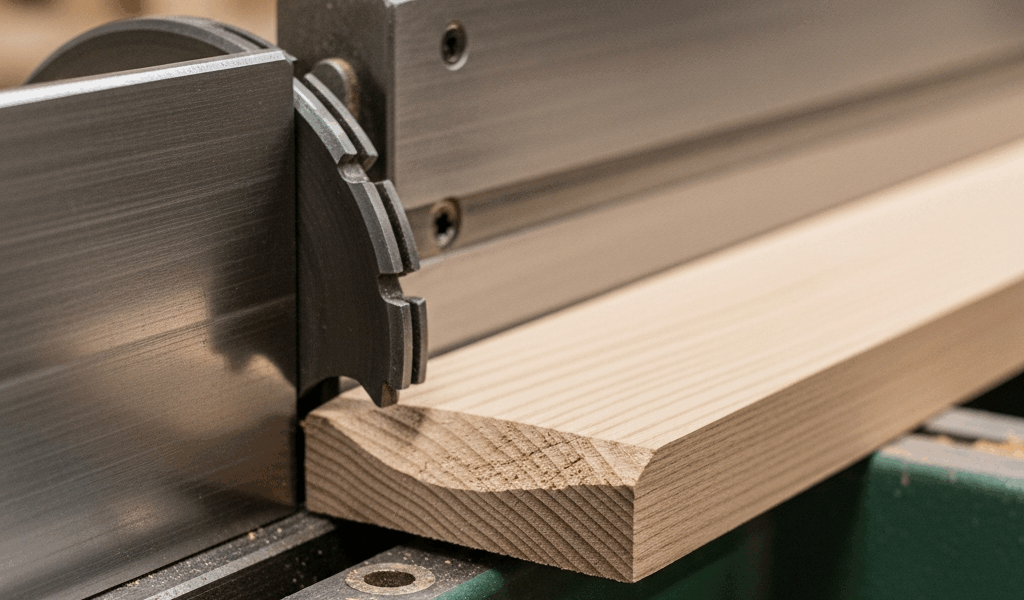
What Jointer Snipe Actually Looks Like
Jointer snipe has shifted noticeably with all the misinformation flying around. Half the forums online conflate it with planer snipe, and the other half are just guessing. So let me be direct about what we’re actually dealing with before anything else.
Jointer snipe on first pass is a specific animal. That shallow scoop — the one that appears in the first three or four inches of your board right where it enters the cutterhead — shows up immediately after that first pass. The rest of the board came out flat and square. That part came out scooped. Infuriating doesn’t cover it.
The confusion starts here: most woodworkers lump this together with planer snipe. It isn’t the same thing. Planer snipe happens at the outfeed end when a board tips or the rear rollers let go too early. Jointer snipe at the infeed? That’s a mechanical alignment issue sitting right under your hands, waiting to introduce itself the moment you run a cupped 2×6 through. I learned this distinction standing at my old Powermatic 54A, wondering why my tables looked level but my walnut boards still came out scooped on the leading edge. Wasted about two hours chasing the wrong fix. Side-step the error I made.
But what is jointer snipe, really? In essence, it’s the cutterhead taking a deeper bite than you set because the board isn’t fully supported at first contact. But it’s much more than that — it’s a symptom of something mechanical that needs diagnosing correctly, or you’ll adjust things that aren’t broken and miss the real culprit entirely.
The Three Most Common Causes
Infeed Table Too Low
This is the one I see most often. Your infeed table sits lower than the cutterhead’s arc of rotation. When a board slides onto the infeed table ahead of the knives, there’s a gap between the board surface and the arc the knives will trace. First knives engage while the board is still unsupported — taking a deeper bite than you intended. That’s snipe, mechanically speaking. Set your infeed for a 1/32-inch cut but the table dips 0.015 inches below the cutterhead arc? You’re actually taking 0.047 inches at initial contact. Small numbers. Big visible difference on your finished board.
Outfeed Table Misalignment
The outfeed table must sit flush with the highest point the cutterhead reaches. Even slightly low — barely visible to the naked eye — and the board loses support after passing under the knives. The back half pivots downward slightly. Front knives on their next rotation dig deeper into wood that’s now sitting lower than it should be. That’s what makes this particular cause so sneaky: you set everything once and assume it’s holding. Tables drift. Seasons change. Cast iron moves.
Worn or Twisted Tables
Cast iron wears. Tables twist over decades. A jointer that was perfectly aligned five years ago might be twisted now — rust, uneven storage, or just humidity cycling through seasons can throw a table out of true. If the infeed table twists so the leading edge runs lower than the trailing edge, every single board entering that jointer hits that low point first. Automatic snipe, every pass, no exceptions.
How to Check Your Infeed and Outfeed Table Alignment
Quick note before the rest of this. If your alignment checks out clean here, you’ve eliminated the most common causes in about ten minutes.
While you won’t need a full metrology setup, you will need a handful of quality tools. A precision straightedge — a real one. I use a 48-inch Starrett that cost more than it should have. Worth every dollar. Don’t use a level. Levels measure gravity, not flatness. Those are different things.
Place the straightedge perpendicular to the cutterhead, resting on both tables simultaneously. It should sit dead flat on both surfaces. A gap anywhere under that straightedge is your problem zone. Most machines show a tiny gap at the very front of the infeed — normal wear. But more than 0.005 inches — thinner than a single sheet of copy paper — and you’re in snipe territory.
Here’s the critical measurement: the outfeed table should sit exactly flush with the arc the cutterhead knives trace at their highest point. Lower the infeed table completely out of the way. Place your straightedge lengthwise down the center of the outfeed, parallel to the cutterhead axis. No rocking. Now manually rotate the cutterhead so the knives reach their absolute peak. The knife edges should just barely kiss the straightedge. Not press. Kiss. There’s a real difference in feel between those two things — you’ll know it when you find it.
While you’re already set up, check for twist. Place the straightedge diagonally from the front-left corner of the infeed to the back-right corner, then check front-right to back-left. Both diagonals should sit flat. One rocks? That’s twist. Twist requires table resurfacing — not an adjustment, not a shimming hack. Resurfacing.
How to Fix It — Adjustments in Order
Start with the outfeed table. Always. This table is your reference point for everything else. Raise or lower it until a straightedge laid lengthwise sits perfectly flat and the knife tips just graze it at peak rotation. Lock it down. Don’t touch it again.
Once the outfeed is set, dial in your infeed depth of cut. Most people run this too deep on the first pass — I’m apparently guilty of this myself, and going back to 1/16 inch worked for me while anything aggressive never did. Start at 1/16 inch. That’s aggressive enough to do real work but forgiving enough that a board that isn’t perfectly supported won’t get mangled at first contact.
Now, feed technique — because even a perfectly tuned machine fails with sloppy technique. Board starts on the infeed table, ahead of the cutterhead. Push down firmly on the leading end while feeding forward. You’re not just sliding the board along — you’re pressing it against the table surface so every inch stays supported through initial contact. Once the board reaches the cutterhead, keep applying downward pressure at the leading edge until at least six inches of board has cleared the knives and landed on the outfeed table. That handoff moment matters more than most people realize.
Use push blocks. They give you real leverage and keep your fingers intact. A spring-loaded jointer guard might be working against you here — sometimes it lifts the board slightly on entry, reducing downward pressure right when you need it most. Check the spring tension on yours. If it springs open too aggressively, adjust it. Short boards especially.
When the Problem Is the Workpiece, Not the Machine
Cupped or bowed boards lie to you. A cupped board rocks on the infeed table — the leading edge sits lower than the edges — and when it hits the cutterhead, you get a scoop that looks identical to machine snipe. The machine didn’t cause it. The board caused it.
Joint a cupped face with the cup facing downward, toward the table. The board rocks on its outer edges, and the cutterhead flattens the high center. Once that first face is flat, flip it. The second face runs against a flat reference, and snipe won’t happen. That’s what makes this technique endearing to us woodworkers — it uses the problem itself to solve the problem.
Run severely warped rough lumber through a thickness planer first, if that’s what you’re starting with. Yes, you’ll get planer snipe — sand it out. Beats fighting the jointer with stock that’s cupped, twisted, and bowed all at once. A flat face on the jointer is the goal anyway. Get there however you can.
So, without further ado, here’s the short version: if your machine checks out and your technique is solid, the snipe is almost certainly the board, not the tool. That should ease your mind considerably — and point you straight at the actual fix.


Stay in the loop
Get the latest the home woodshop updates delivered to your inbox.