Why Band Saw Blades Drift in the First Place
Band saw drift has turned into a moving target with all the half-baked advice flying around. Tighten the blade, people say. Buy a better fence. Slow your feed rate. You try all of it. The blade still pulls left on your third cut into a board you actually cared about.
As someone who’s fed a lot of expensive walnut through a drifting blade, I put in the hours studying this problem the hard way. Today, I will share it all with you.
But what is blade drift? In essence, it’s when your kerf wanders off your line despite doing everything right. But it’s much more than that. It’s actually a symptom — sometimes four symptoms stacked on top of each other, sometimes just one. Dull teeth. Uneven tooth set. Bad tension. Wrong tracking. Any single one of these creates the same visible mess: a ruined rip cut and a wasted board.
Most articles hand you one fix and send you home. That’s why the drift comes back. The real solution means checking four things in a specific order — blade condition, tension, tracking, fence angle. Skip one step and you’ll be back here next week, short another piece of lumber.
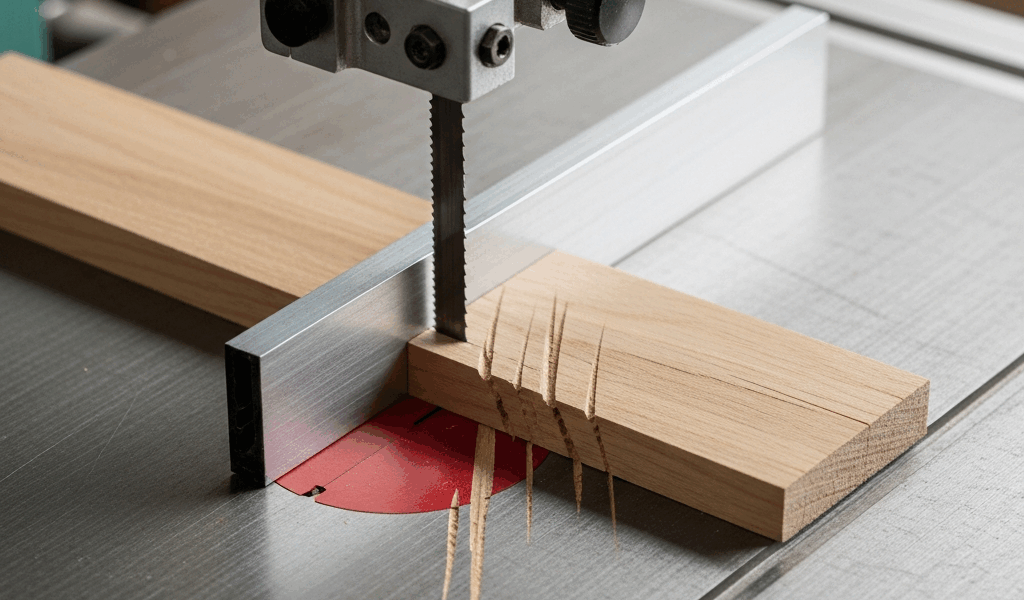
Check the Blade Before You Touch Any Settings
Important part first. People skip it because it feels too basic. It isn’t.
Pull the blade and hold it under a bright light — a cheap clip-on shop light works fine. Run your fingertip across the teeth slowly. You’re feeling for dullness, missing teeth, anything that feels uneven. A dull tooth creates drag instead of a clean slice. That drag pulls sideways as the wood resists, and suddenly your line means nothing.
The other killer is uneven tooth set. Band saw blades have teeth bent alternately left and right in a consistent wave pattern. That offset makes the kerf slightly wider than the blade body, which keeps friction manageable. If even one tooth is bent wrong, crushed, or missing — that side grabs harder. The blade pulls toward it every single time. No fence adjustment in the world corrects this. The blade itself is the problem.
Sight down the blade from the side like you’re looking down a rifle barrel. Left, right, left, right — the pattern should be perfectly consistent. I’m apparently rougher on blades than most, and I’ve pushed Starrett M42 bimetal blades for months past what anyone would recommend. Dull blades with even set will still cut reasonably straight. Blades with uneven set drift no matter what else you fix. Learn from what tripped me up — sight the teeth before assuming the problem is somewhere else.
If the teeth look consistent and reasonably sharp, move on. If anything looks bent or broken, replace the blade first. A 1/2-inch 3-TPI blade from Timber Wolf or Lenox runs $18 to $25 depending on length. That’s a cheap fix compared to another ruined board.
Set Blade Tension and Tracking the Right Way
So, without further ado, let’s dive into the two settings people adjust most and still get wrong.
Tension first. A loose blade wanders — that’s just physics. An overtensioned blade fatigues the tires and can snap unexpectedly. Most drift problems come from under-tensioning, not over. Pull out your manual. The guide for a Delta 28-457 or a Grizzly G0555 14-inch saw includes a tension chart keyed to blade width. Use that chart. If you lost the manual, the manufacturer’s website has a PDF — takes two minutes to find.
No numbers available? The flutter test works fine. Unplug the saw first. Press your thumb gently against the blade at the midpoint of the lower wheel span. It should deflect about 1/4 inch. More than that means it’s too loose. Noticeably less means you’re creeping toward over-tension.
Next comes tracking — which is probably the most invisible cause of drift on an otherwise well-maintained saw. The blade needs to ride centered on the highest point of the rubber tire crown. If it rides too far forward or back on the tire, it wanders under load even if tension is perfect.
The top wheel has a tracking adjustment bolt — usually a knob or bolt that tilts the wheel slightly forward or back. Make small quarter-turn adjustments while the saw runs at idle speed. Watch the blade’s position on the tire. You want it centered, not creeping toward either edge. Dial it in slowly. That’s what makes proper tracking endearing to us woodworkers — it’s simple once you’re actually looking for it.
I learned this the hard way. Four pieces of figured maple — gone — before I noticed the blade was riding halfway off the tire crown. Improper tracking is completely invisible until you look directly at it.
How to Angle Your Fence to Compensate for Drift
Even a perfectly tuned blade with ideal tension and centered tracking can have a natural directional bias. Fighting that bias with your fence is frustrating and mostly futile. Working with it takes about ten minutes and fixes the problem.
Grab a straight piece of scrap — 1×2 pine works, poplar works, anything with a straight edge. Make a freehand rip cut down the middle with no fence. Let the blade go wherever it naturally wants to go. Stop halfway through and hold everything still. Mark both the top and bottom edge of the board right at the kerf with a pencil.
Pull the board away carefully without shifting it. Connect those two marks on the side of the board with a straight line. That line is your blade’s natural cut direction — its actual drift angle under real cutting conditions.
Now angle your fence parallel to that line rather than parallel to the miter slot. If the blade drifts three degrees left of the slot, the fence goes three degrees left. The fence and the blade are now cooperating instead of fighting each other. Cuts straighten out immediately.
This isn’t a workaround. Production shops use this technique routinely. Band saw blades have individual character — that’s what makes them different from table saw blades, and it’s what makes band saw woodworking endearing to those of us who use them seriously. Accounting for that character produces better results than chasing it around with micro-adjustments.
When the Drift Comes Back After Fixing It
You ran through all four checks. Cuts came out straight. Two weeks later, the drift crept back. That’s normal — not a sign something went wrong.
Blade tension drifts as rubber tires compress with use. Check tension every 8 to 10 hours of actual cutting time. Recheck tracking monthly on a regularly used saw. Tire wear itself is slow — a quality 14-inch urethane tire might last two to three years of regular shop use — but when the crown flattens, tracking changes and drift follows.
Guide bearing wear contributes too. Upper and lower blade guides that have developed any play let the blade shift sideways slightly during cuts. That small movement magnifies into visible wandering over the length of a board. Replace guide bearings every three to five years depending on how hard the saw works, or immediately if you feel new blade slop in the guides.
Blade dullness also returns faster than most people expect. A 4-TPI blade used for 20 hours of heavy ripping — thick stock, dense hardwoods — loses meaningful sharpness. It still cuts. The drag increases noticeably though, and drag causes drift. Replace the blade when cuts slow down or require noticeably more feed pressure than they used to.
Here’s the quick checklist. Run through it anytime cutting feels less clean than before:
- Blade sharp with even tooth set?
- Tension at manufacturer spec?
- Blade centered on tire crown?
- Fence angled to match natural drift?
Four checks. Fifteen minutes. Straight cuts again. — at least if you work through them in order and don’t skip the blade inspection because it feels too obvious. That’s the step that gets everyone.


Stay in the loop
Get the latest the home woodshop updates delivered to your inbox.