Why Band Saw Blades Keep Breaking
Band saw blade troubleshooting has shifted noticeably with all the conflicting advice flying around. As someone who has stood in a workshop surrounded by snapped blades and mounting frustration, I spent months getting comfortable with why this keeps happening. Today, I will share it all with you.
Here’s the thing nobody tells you upfront: the blade is almost never actually the problem. It’s just what breaks. The real culprits are hiding somewhere in your machine setup or your cutting technique — and they’ll keep chewing through blades until you find them.
Blades fail in three predictable zones. The weld point snaps under stress. The gullet cracks from heat buildup during aggressive cuts. The teeth fatigue from constant micro-bending — thousands of flex cycles per minute, every minute you’re running the saw. Each failure zone points to a different root cause. Figure out which zone, and you’re most of the way to a fix.
Check Your Blade Tension Before Anything Else
Worth saying out loud. Tension is where the majority of blade failures start, and it’s the easiest thing to actually diagnose.
An under-tensioned blade flexes too much on the wheels. It bends, returns, bends again — thousands of times per minute. After a few hours of cutting, the metal work-hardens and turns brittle. It cracks at the weld or shatters mid-body without any warning whatsoever.
Over-tensioned blades are a different problem. Stress concentrates at the wheel contact points and hammers the weld joint repeatedly. The frame itself starts to flex in ways it wasn’t designed to. Cranking the tension knob until your hand hurts isn’t doing you any favors.
Most hobbyist band saws run chronically under-tensioned. Users get nervous about the tension knob — they imagine snapping the frame or warping the wheels. So they back off. The blade feels a little loose. They live with it. Two weeks later, another snapped blade. Avoid the path I took.
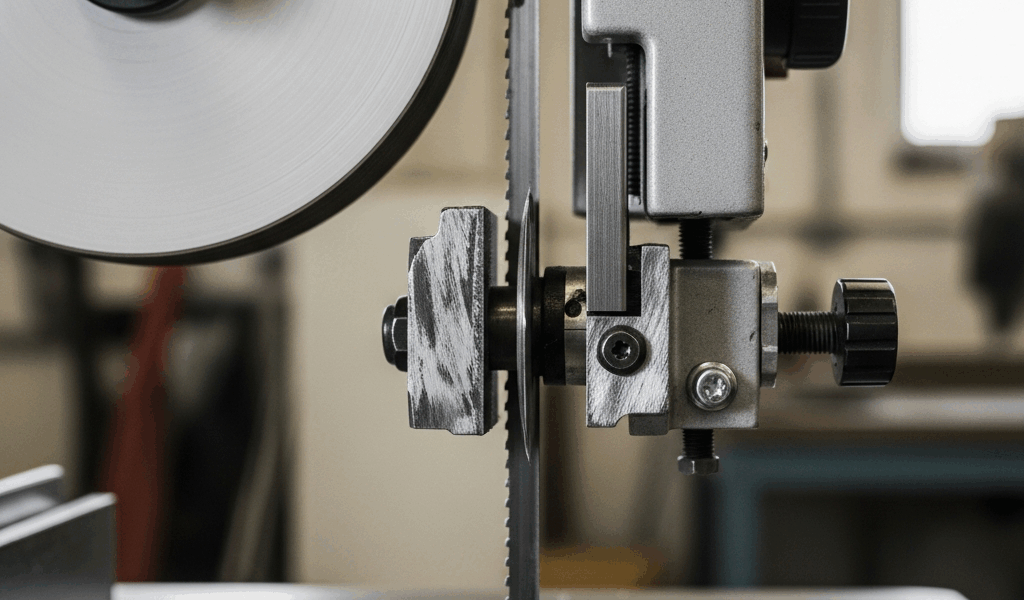
Here’s how to set tension without a dedicated gauge. Close the blade guard, then open it back up — you’ll use that midpoint between the wheels as your reference zone. Press your thumb sideways against the blade at that midpoint with moderate pressure. The blade should deflect roughly a quarter inch. Not a half inch. Not barely any movement at all. A quarter inch — approximately the thickness of your pinky nail.
Deflection beyond half an inch means you need to tighten the tension knob. A turn or two at a time, then check again. Barely any deflection means you’ve gone too far — back off slightly.
This method works because it calibrates to your specific saw’s frame flexibility. A heavy industrial 14-inch machine needs considerably more tension than a bench-top Delta or Ryobi model. Your thumb becomes a repeatable, personal reference point tied to your actual equipment.
Wheel Alignment and Blade Tracking Problems
Tension is step one. Step two is examining how the blade sits on the wheels — and this is where a lot of people stop looking too soon.
A blade riding too far forward on the wheel puts a constant edge load on one side of the blade body. Within a single cutting session sometimes, that uneven stress concentrates at the gullet or tooth line. The blade cracks. Advancing the tracking adjustment a little here, a little there can seem totally harmless. It isn’t.
To check tracking: lower the blade guard until you can clearly see the wheel rim, then spin the wheel slowly by hand. Watch where the blade rides. It should sit centered on the crown — not drifting toward the front or the back. If it’s creeping, adjust the rear tracking knob incrementally. We’re talking quarter turns at most. That small an adjustment can be the difference between a centered blade and one headed for an early failure.
Run the saw at low speed with the guard open and watch the blade through one full wheel rotation. It should stay in exactly the same position on the rim. If it moves, stop the saw and adjust again before cutting anything.
There’s a less obvious alignment issue that catches people completely off guard — coplanar wheel alignment. Both wheels need to sit in the same vertical plane. If the bottom wheel is tilted even slightly forward or backward relative to the top wheel, the blade experiences a constant twist. Not dramatic. Just enough to stress the blade body unevenly, day after day, until the weld joint gives out.
Checking coplanar alignment requires a straightedge and some patience. Lay the straightedge across both wheel rims at the blade contact point. It should lie flat against both wheels at the same time. Any gap at either end means you have a plane mismatch — and many machines drift out of alignment gradually through normal use and vibration.
Feed Rate, Material, and Operator Technique
Frustrated by slow progress and a pile of oak boards that needed resawing by the end of the afternoon, I once pushed hardwood through my Jet 14-inch at nearly twice the appropriate speed. That was a $38 blade. Gone in under 20 minutes.
When you force the cut, the blade teeth can’t clear the gullet fast enough. Heat builds. Steel softens slightly. Tension effectively drops. Friction climbs. More heat follows — and then the gullet cracks, the teeth dull, and the blade tears apart.
The correct feed rate has a specific feel to it: the saw does the work, you guide. If you’re leaning your body weight into the material trying to push it through, you’re being too aggressive. The bottom wheel’s rotation should pull the material forward naturally. Your job is keeping the fence aligned or following your cut line — nothing more than that.
Material thickness and blade TPI are not suggestions. A 3/4-inch piece of red oak cuts smoothly with a 4 TPI blade. A 3-inch-thick walnut slab needs something coarser — 2 TPI minimum. Resawing thick stock with a fine-tooth blade meant for thin material is a blade killer, full stop. The blade binds, temperatures spike, and the weld fails within minutes.
Hardwoods demand real respect. Maple, walnut, and hard oak are dramatically denser than pine or poplar. Slower feed rates, coarser blades, more patience. Using the same setup you’d use for softwood on a piece of hard maple will cost you a blade every single time.
When the Blade Itself Is Actually the Problem
But what is a blade defect, exactly? In essence, it’s a manufacturing flaw — usually at the weld — that causes failure independent of your machine setup. But it’s much more than that, because a defective blade will mimic technique problems until you know what to look for.
A weak factory weld fails fast and consistently. If your blade snaps at the same spot every single time — within the first few uses, always at the seam — you’re dealing with a weld defect. Cheap imported blades from no-name manufacturers fail this way regularly. The weld wasn’t fused properly, or the metal at the joint is just brittle from the start.
If the blade is breaking in different spots over time, the machine or your technique is the problem. Rule that out first — every time.
I’m apparently a brand loyalist when it comes to blades, and Lenox works for me while random off-brand Amazon blades never last more than a session. Starrett and Timber Creek are similarly reliable. You’ll pay more upfront — a Lenox 93.5-inch blade runs around $45 to $55 depending on TPI — but they last longer and fail far less often. A $28 blade that breaks in an hour costs more per minute of usable cutting than a $50 blade that lasts a solid week of shop time.
Quick Reference Diagnostic Checklist
- Check blade tension first. Thumb deflection test. Quarter inch at midpoint between wheels.
- Verify blade tracking at low speed — blade should stay centered on the rim through a full rotation.
- Check coplanar wheel alignment using a straightedge across both wheel rims.
- Evaluate feed rate and match blade TPI to actual material thickness. Are you forcing the cut?
- If the blade breaks at the exact same spot repeatedly, replace it with a quality brand like Lenox or Starrett.
- If breaks are occurring in different locations each time, go back to step one.
That’s what makes systematic diagnosis so valuable to us woodworkers — one afternoon of checking these six things beats replacing blades indefinitely. Fix the root cause. The replacements will stop.


Stay in the loop
Get the latest the home woodshop updates delivered to your inbox.