What Roller Marks Actually Look Like
Thickness planer problems have turned into a moving target with all the conflicting advice flying around. Everyone blames the blades first. Rarely the rollers. That’s usually the wrong call.
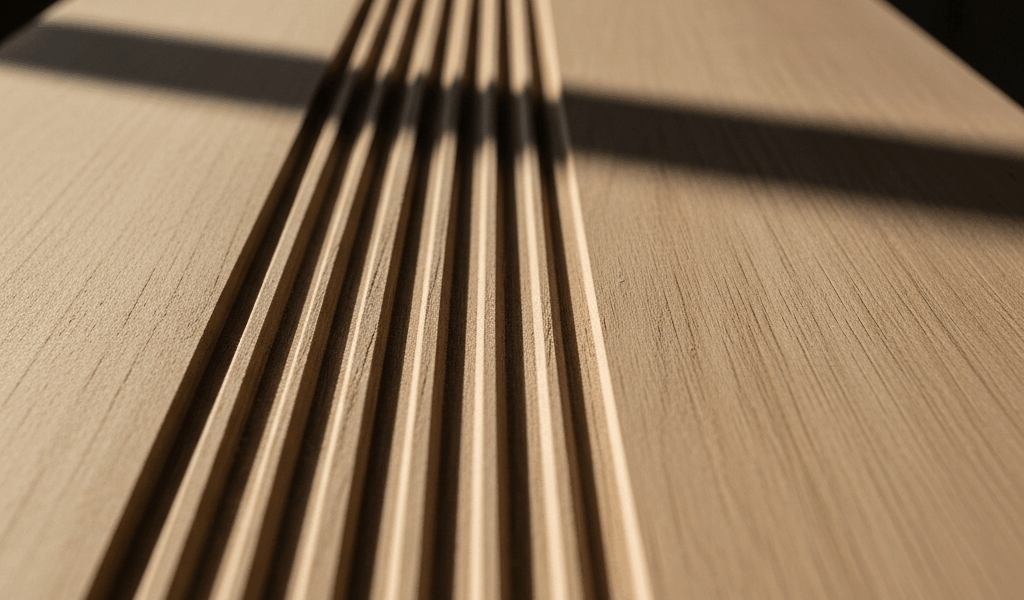
Roller marks have a specific look — parallel compression lines running perpendicular to the grain. Two or four distinct streaks depending on your machine’s configuration. They’re not fuzzy. They’re not random splintering. They’re shiny, sometimes slightly pressed-in lines that look exactly like something cylindrical bore down too hard on the wood surface.
I learned this the hard way three years ago with a DeWalt 13-inch benchtop planer — the DW735, specifically. Ran a pine board through, flipped it, and there were two pressure lines running the full length. Clean. Consistent. Unmistakable. My first thought was the machine was dying. It wasn’t. The feed roller was just cranked too tight.
Knowing what roller marks look like matters because they’re easy to confuse with other defects. Snipe gouges the leading or trailing edge of a board — usually a quarter-inch deep, sometimes more. Mill marks ripple parallel to the grain. Tearout happens where grain reverses and fibers lift away in jagged chunks. Roller marks are different from all of those. Compression damage from the infeed roller. That’s the whole story.
Soft woods give it away immediately. Pine, spruce, fir — they compress easily, and the marks show up obvious and sometimes slightly burnished where the roller glazed the fibers. Oak and maple resist compression better, so the damage hides. Run your hand across the surface or hold a work light at a low raking angle. You’ll find it.
Why Feed Rollers Leave Marks on the Surface
But what is a feed roller, exactly? In essence, it’s a spring-loaded cylinder that pushes wood down and forward into the cutting head at a consistent rate. But it’s much more than that — it’s also the most common source of surface damage that woodworkers misdiagnose for months.
This is the piece to know up front.
The roller is either rubber-coated or serrated steel. As wood passes underneath, the roller’s weight plus spring tension compress the wood fibers. Normal. Necessary. The problem starts when the spring tension gets cranked past the useful range — the compression becomes deep enough to leave a permanent impression. Not a scratch. A depression. The fibers actually compact.
Dirty rollers make everything worse. Pitch, sawdust, and resin build up unevenly. Instead of even contact across the full roller width, you get concentrated pressure at the buildup spots. I’ve also seen hardened rubber do the same thing — the coating loses flexibility over time, concentrating force into a narrower band instead of distributing it.
That’s what makes roller maintenance so endearing to us woodworkers who’ve been burned by it. A five-minute cleaning job prevents an hour of troubleshooting.
How to Adjust Feed Roller Pressure
So, without further ado, let’s dive in.
While you won’t need a full machine teardown, you will need a handful of basic tools — an adjustable wrench, a few scrap boards matching your stock thickness, and your machine’s manual or the PDF version pulled up on your phone.
Find the pressure adjustment screws on the infeed roller. Most benchtop planers — the Makita 2012NB, the DeWalt DW735, the Powermatic 15HH — have two screws, one on each end of the roller, accessible from the top or side without removing any guards. Cabinet-style machines sometimes use a single lever system positioned near the base. Check your manual. The adjustment point is rarely buried.
Back the pressure off in quarter-turns. Not half-turns. Not full rotations. Quarter-turns. Run scrap through after each adjustment. Listen for slipping — a dragging or chattering sound means you’ve gone too far loose. Watch the feed. Smooth and quiet is what you’re after, with no visible pressure lines on the scrap surface.
The working sweet spot feels like this: tight enough that the screw holds without wobbling, loose enough that you can turn it with moderate thumb pressure. If you’re leaning into it with both hands, you’ve overcorrected the other direction.
Avoid the path I took. I went from too tight to too loose in one session — got impatient and backed off three full turns at once. Spent the next hour chasing feed slippage instead of compression marks. Always test with scrap that matches your actual stock thickness before running anything you care about.
Cleaning and Inspecting the Rollers
First, you should clean the rollers before adjusting anything — at least if you want an accurate read on whether pressure is actually the problem. Pitch and resin buildup mimics over-tightening almost perfectly. Fix the wrong thing first and you’ll chase this problem for days.
Mineral spirits work well here. A brass brush or a non-abrasive scotch-brite pad for the scrubbing. Rotate the roller by hand and work across the full width. For serrated steel rollers, get debris out of the grooves — a small brass brush handles this better than any cloth. Rubber-coated rollers need gentler treatment. Soft brush, mineral spirits, no aggressive scraping.
Once the roller’s clean, inspect it. Run your hand across the surface. A healthy rubber roller feels smooth and gives slightly under thumb pressure — maybe a millimeter of give. A worn or hardened roller feels stiff, lumpy, or brittle. Flat spots happen from age or from machines stored near windows in direct sun. That’s a replacement situation, not an adjustment situation.
I’m apparently rougher on rubber rollers than most people, and replacing them every few years works for me while skipping cleaning never does. The $45 replacement rubber on the Makita is cheaper than the figured walnut you’ll ruin discovering the old roller was shot.
When the Marks Keep Coming Back
Adjusted the pressure. Cleaned the rollers. Three test passes on scrap. Marks are still there. A few specific culprits usually cause this.
Stock thickness might be the best option to check first, as diagnosing roller marks requires ruling out the obvious. That is because most benchtop planers have a minimum thickness rating — usually around 1/8 inch — and running stock below that forces the roller to grip harder to keep the board from chattering. The machine compensates. Compression marks follow. If you’re planing thin stock consistently, a wider machine or a hand plane is the right answer, not more adjustment.
Grain direction causes problems too. Figured grain, bird’s-eye patterns, reversing grain — all of these fight the planer. The wood slips slightly under the roller, then resets, and that micro-movement creates an impression. Feed at a slight angle when possible. Even two or three degrees changes the contact geometry enough to help on stubborn stock.
Worn springs are less common but real. Springs lose tension over years of use — especially on machines running 8-hour shop days. When the spring can’t hold the pressure you’re dialing in, you get inconsistent contact. Checking this properly requires removing the roller assembly. That’s the point where calling the manufacturer tech line makes more sense than guessing.
Frustrated by persistent marks after two rounds of adjustment and a full cleaning, most woodworkers eventually face a replacement decision. Parts run $80–$200 on most benchtop models. Installation takes about an hour with basic hand tools. Cabinet machines and commercial units are different — reassembling a larger machine without proper alignment creates worse problems than the original marks. A service center call is worth the $150 diagnostic fee on anything over 20 inches wide. This new approach to knowing when to stop DIY-ing took off several years later in the online woodworking community and eventually evolved into the practical rule enthusiasts know and follow today: fix what you understand, and call about the rest.


Stay in the loop
Get the latest the home woodshop updates delivered to your inbox.