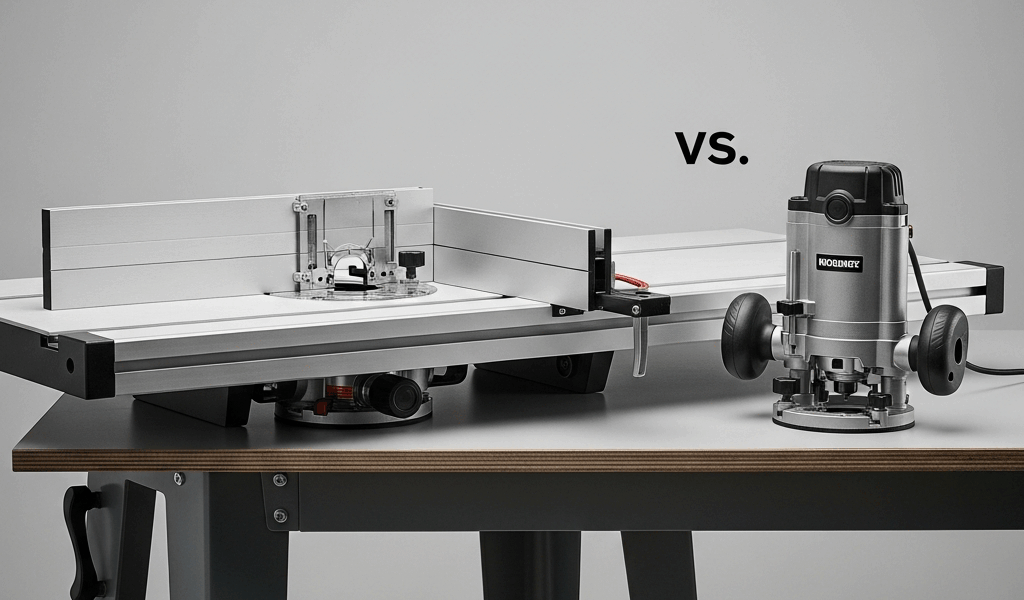
Router Table vs Handheld Router — Do You Need Both
The router table vs handheld router debate has evolved with all the gear-worship and conflicting forum advice flying around. As someone who’s been running a small custom furniture and cabinet shop for about twelve years, I worked through the fundamentals of both tools — starting with a beat-up Craftsman handheld I grabbed at a garage sale for eighteen dollars and eventually landing on a full Jessem Mast-R-Lift II setup in a dedicated cabinet. Here’s my honest take, stripped of the usual enthusiasm that makes every tool sound like a life-changing necessity.
This article includes affiliate links. We may earn a commission at no extra cost to you.
Short answer — you don’t need both right away. Longer answer — you’ll probably want both eventually, but the order matters more than most people think, and the path between them is cheaper than the woodworking industry wants you to believe.
Start With a Handheld Router — Always
If you’re standing at the tool store trying to decide, buy the handheld router first. Full stop.
But what is a handheld router, really? In essence, it’s a motor spinning a cutting bit at anywhere from 20,000 to 25,000 RPM that you guide across the work. But it’s much more than that — it’s the tool that goes to the material instead of waiting for the material to come to it. That distinction matters enormously in real shop situations.
You can cut dadoes across a wide panel, flush-trim laminate on a countertop, inlay a hinge, template-rout a guitar body, carve a sign. None of that happens comfortably in a router table. The handheld is also portable — you can throw it in a bag, bring it to a job site, use it on furniture that’s already assembled, and store it in a drawer when you’re done. That’s what makes the handheld router endearing to us furniture and cabinet folks.
People sometimes assume a router table just does the same thing, mounted differently. That’s not quite right. A router table is a specific-use tool. It excels at edge profiling, repetitive passes, and certain jointing operations — but it gives up a huge chunk of the freehand capability that makes routers so genuinely useful.
Frustrated by conflicting advice online, I spent about six months early in my woodworking career running only a Porter-Cable 690LR — a 1-3/4 horsepower fixed-base unit that costs around $130 new. Edge profiles, dadoes, rabbets, mortises with a shop-made jig. It all worked. Some operations ran slower than they would’ve in a table, and setup required more deliberateness. But I learned that router deeply. Save yourself the trouble I had of skipping that phase — it makes everything else harder later.
Choosing just one tool? Handheld first, no hesitation.
When a Router Table Becomes Worth It
There’s a specific moment when a router table stops being a luxury item and starts being something you actually need. That moment arrives when you begin doing repetitive work on edges — especially when small parts are involved.
Here’s where a router table earns its floor space:
- Raised panel doors — Running a raised panel profile on a cabinet door with a handheld router is technically possible and practically miserable. Thirty doors in, you’re fighting the router’s weight, bit deflection, and your own arm fatigue. The table lets you register the panel against the fence and push it through slowly, consistently, without any of that drama.
- Repeated edge profiles — Ten identical drawer fronts with a roundover or ogee means ten individual clamping setups with a handheld. In a table, you set the fence once and run all ten pieces in about four minutes. Honestly, this alone changed how I think about production runs.
- Jointing narrow boards — A straight bit with an offset fence is a legitimate jointer substitute for boards up to about three inches wide. Narrow strips for glue-ups, edge banding, drawer side stock — I do this weekly.
- Small parts — Probably the biggest reason of all. When the router is physically larger than the workpiece, you have a stability problem — and a safety problem. On the table, the work moves past the stationary bit. Small parts become manageable. Safe, even.
The router table became worth it for me when cabinet work started dominating my order list. Before that, it was a convenience. After that, it was a production tool. The line between those two things is repetition — that’s the signal to watch for.
DIY Router Table — The Budget Path
This is the piece to know up front, because it changes the entire cost calculation.
You don’t need to spend $300 to $800 on a commercial router table to find out whether you’ll actually use one. You need about $50 to $100 in materials and a free Saturday afternoon.
The basic DIY router table is a sheet of 3/4-inch MDF with a hole cut for your router’s base plate, mounted in a simple torsion box or small cabinet. Here are the core dimensions I used for a benchtop version that sat on my assembly table for three years:
- Tabletop — 24 inches by 32 inches, 3/4-inch MDF
- Subtop — 1/2-inch MDF, same footprint, laminated underneath to accept the router plate
- Opening for the router plate — sized to your router’s base, typically around 6 by 9 inches
- Fence — two layers of 3/4-inch MDF glued together, roughly 3 inches tall and 32 inches long, with a semicircular relief cut at the center for bit clearance
The fence clamps to the table with a pair of standard F-clamps — the orange ones from Harbor Freight work fine. The router mounts from below using the existing base plate screws. The whole assembly sits on sawhorses or a workbench. Total material cost, using leftover MDF from a previous sheet: about $15 in glue and hardware. Buying materials new runs $50 to $80 depending on your local lumber yard prices.
I built my first version using a plan from Woodsmith magazine’s free archive, adapted for my Porter-Cable base plate dimensions. It ran for three years before I upgraded to a proper cabinet. By that point, I knew exactly what I wanted — because I’d used the cheap version long enough to understand what actually annoyed me about it.
That’s the real value of the DIY approach. It’s not just cheap — it’s educational. You figure out how you actually use a router table before committing real money to one. This new workflow took hold in my shop several years later and eventually evolved into the dedicated lift-and-cabinet setup enthusiasts know and covet today.
Safety Differences
This section matters more than most people give it credit for — and it gets glossed over constantly in tool reviews.
Handheld router safety lives mostly in technique. The bit spins near your hands, at 20,000 to 25,000 RPM, and mistakes like climb cutting or inadequate workpiece support are where injuries originate. Good technique handles most of the risk — but technique has to be built deliberately. It doesn’t arrive automatically.
Router table safety is a different profile entirely. Your hands stay on top of the workpiece, pushing it along the fence, away from the bit. For standard edge profiling, your fingers never approach the cutting zone. The bit is below the table surface, the fence controls lateral movement, and the whole operation feels — and genuinely is — more controlled.
Where the router table introduces its own risks — and this is real, not theoretical — is freehand routing without a fence or starting pin. The bit can grab the workpiece violently. Kickback on a router table happens fast and without much warning. Always use a fence, a starting pin, or a miter gauge. Never hold a piece against a spinning bit without support of some kind.
Small parts are dramatically safer in a router table setup. Pieces under about six inches long are genuinely difficult to rout safely with a handheld — there isn’t enough surface area to stabilize the router over such a small workpiece. On the table, the part moves past the bit under complete control. This single fact justified the table for my shop before anything else did.
The Verdict — Build a Simple Table Before Buying One
While you won’t need a $600 router table cabinet with integrated dust collection to get started, you will need a handful of basic materials and a router you already own. Here’s the practical path I’d actually recommend:
- Buy a mid-range fixed-base handheld router — something like the Bosch 1617EVS, which runs about $180 new and often less used, or the DeWalt DWP611 around $130. Both accept 1/4-inch and 1/2-inch collets. Both have enough power for real furniture work.
- Use it for six months. Learn it. Do everything with it — dadoes, edges, templates, the whole range. First, you should resist the urge to build a table immediately — at least if you want to understand what the table is actually solving later.
- When repetitive edge work starts eating your time, or small parts become a stability problem, build the MDF benchtop table described above. Mount your existing router in it. Run it for three to six months.
- A dedicated cabinet with a lift system might be the best option at that point, as serious router table work requires consistent bit height adjustment and table flatness over time. That is because production-level edge profiling will expose every weakness in a temporary setup — and by then you’ll know exactly what to fix.
- If the DIY table just sits there gathering sawdust, you saved $400 and learned something genuinely valuable about your own work habits.
The woodworking tool industry is very good at making everything sound essential. A dedicated router table with a lift, a fence system, and integrated dust collection is genuinely wonderful — I won’t pretend otherwise. But wonderful and necessary are different things, and conflating them is expensive.
Burned by an impulse purchase of a benchtop router table I barely touched in my first shop, I learned to test before buying. Don’t repeat what I did. The DIY table approach costs almost nothing and tells you everything you need to know about whether a dedicated router table actually belongs in your shop. Start there. Upgrade when the work demands it — not before, and not because a forum thread made it sound indispensable.
Your handheld router, properly learned, will handle more than you expect. The table comes when the volume and the repetition make the space worth giving up.


Stay in the loop
Get the latest the home woodshop updates delivered to your inbox.