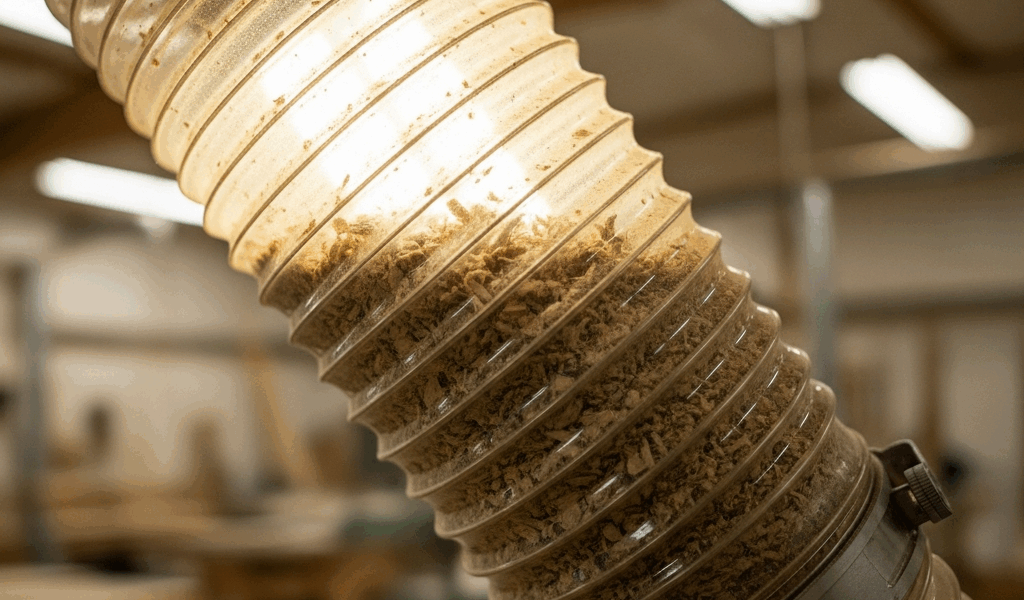
Why Woodshop Dust Hoses Clog So Easily
I discovered dust collection hose clogging the hard way — midway through a walnut project when my shop vac suddenly lost all suction. That’s when I learned there’s a reason this happens so consistently with certain woods and setups.
Fine dust particles, especially from dense hardwoods like walnut and ash, are genuinely problematic. These woods produce flour-fine dust that behaves differently than the coarser chips from softwoods. Your shop probably hovers around 45-60% relative humidity, right? Add that moisture into the mix, and those particles become slightly tacky. They compress against hose walls rather than flowing freely.
Static charge compounds the issue. Plastic hose naturally builds electrical charge as dry dust moves through it — that charge makes particles cling to the interior walls instead of staying suspended in the airstream. The effect intensifies with undersized hoses or low CFM situations where airflow velocity drops below the point needed to keep everything moving.
Hose angle matters more than most woodworkers realize. Gravity always wins. Any sagging section becomes a dust trap.
How to Clear a Blocked Dust Hose Right Now
Ranked by actual effectiveness and time investment, here are your clearing options.
Method 1 — Fish Tape Technique (Most Reliable)
This works. I’ve cleared 15-foot runs of 4-inch hose completely blocked with walnut dust using a 1/4-inch steel fish tape from my electrical kit — took about as long as a coffee break. Disconnect the hose from both ends. Feed the fish tape through slowly, applying gentle rotational pressure. The tape physically breaks up the compacted dust plug and pushes it through.
Expect 10-15 minutes per 25-foot hose section. The tape doesn’t damage interior walls if you avoid jamming it. Cost: $15-25 for a decent fish tape if you don’t own one already.
Method 2 — Shop Air Blowback (Fastest)
Compressed air can dislodge blockages quickly. Here’s the safety reality though: unregulated compressed air pressure exceeding 30 PSI can rupture lungs if directed at skin. Disconnect both hose ends. Attach your shop compressor regulator set to 20-25 PSI maximum — that’s the key number. Aim the hose outlet outdoors or into a collection container. Pulse short bursts rather than continuous pressure.
This clears loose blockages in 2-3 minutes. Dense plugs won’t budge this way.
Method 3 — Hose Straightening and Shaking (Low Tech)
Disconnect from both ends. Lay the entire hose in a straight line on the ground. Pick it up vertically and shake it vigorously like you’re ringing a very large bell — sounds ridiculous, but it works. The movement helps dislodge settled dust. Then manually work your hand along the hose exterior, feeling for the blockage location and applying pressure to break it up.
Clears 60% of minor clogs in 5 minutes. Won’t solve dense compacted blockages.
Method 4 — Disconnecting and Reverse Flow
Remove the hose section. Reconnect it backward through your dust collection system so air flows backward through the normally clogged section. This reverses the pressure differential. Run your vac for 30 seconds, listening for the blockage to eject.
Works on loose buildup. Skip this if you have a cyclone pre-filter — you don’t want that material going backward into your main tank.
Hose Routing Mistakes That Cause Clogs
Probably should have opened with this section, honestly. Most of my clogging issues came from poor layout decisions I could have prevented entirely.
Sagging hose sections trap dust at the low point. Your 4-inch or 5-inch hose should slope upward toward the collector at no less than 1/4 inch per foot of run. If you have a 20-foot horizontal run, that’s a 5-inch elevation gain minimum — sounds like nothing until you’re clearing clogs every other week. I initially ran mine nearly level. The moisture and dust settled in the sag like a drain trap, and clogs followed within weeks.
Too many elbows choke airflow. Each 90-degree elbow increases resistance. Four elbows in a 25-foot run is excessive. Every elbow slows particles down. Slowed particles equals settled dust equals blockages — that’s the equation. I reduced mine from five elbows to two by repositioning equipment slightly, and clogs virtually stopped.
Hose diameter mismatches create dead zones. Your 4-inch table saw port connects to 5-inch main hose, and that transition creates a pressure pocket where velocity drops. The transition should be gradual — use a tapered connector, not an abrupt step. A $12 stepped reducer prevents velocity collapse.
Low spots become moisture traps. If your 30-foot hose run dips below the vac inlet height anywhere along the path, water and condensation pool there. Dust adheres to the wet area and hardens into cement. I added a 2-inch diameter drain valve at the lowest point of my main run — costs $8 — and manually drain it weekly during humid months.
CFM undersizing for the hose diameter kills everything. A 4-inch hose needs at least 400 CFM to maintain transport velocity (3500 feet per minute in the hose). A typical 2 HP shop vac without a cyclone pulls 150 CFM at the hose, which is why you clog constantly. Upgrade either the vac (expensive) or the cyclone pre-filter (cheaper).
Quick Setup Changes to Stop Future Blockages
Inline Cyclone Pre-Filter ($80-250)
This is the single fastest ROI change I made. A small cyclone separator — I went with the $150 Oneida — drops into the hose run before your main vac. It removes 95% of fine dust before it enters the hose. Clogs dropped from monthly to never in my shop.
The cyclone plugs directly into your tool, then the hose runs from the cyclone to the vac. No hose routing change needed. Just mount it overhead or to a wall. Budget option: a cheap $80 3-gallon barrel cyclone lid works okay but clogs more often — better than nothing, not ideal.
Hose Diameter Upgrade (Budget: Varies)
Moving from 4-inch to 5-inch main hose improves velocity and reduces settled dust — we’re talking $2.50-4 per foot. A 25-foot upgrade costs $65-100. Combine this with a tapered adapter at your tool connection ($12-15), and blockages reduce by 50-70%. Not a fix-all, but a multiplier effect.
Angle Adjustments ($0-50)
Reposition your vac or ductwork so hose slopes properly. This might mean moving a stand or repositioning a tool. I shifted my main vac cart 18 inches higher using a rolling platform ($40) to create proper slope. Free if you can already achieve it.
Moisture Trap Installation ($8-20)
Add a 2-inch ball valve at the lowest hose point. Drain manually every two weeks during high-humidity months (May-August in most climates). Prevents the water-dust paste that causes permanent blockages.
Monthly Dust Hose Maintenance Checklist
Every 4 weeks, do this:
- Visually inspect hose for sagging sections. Adjust hangers or supports if slope drops below 1/4 inch per foot.
- Feel along the exterior of main hose runs for hard spots — indicates internal buildup. Tap gently with a rubber mallet to break up loose deposits.
- Drain the moisture trap or low-point valve if installed. Expect 2-4 ounces of liquid in humid months.
- Check all hose connections for air leaks by listening near joints while the vac runs. Seal any gaps with hose clamps ($1 each).
- If you’re using an inline cyclone pre-filter, empty its collection chamber before it reaches 75% full. Overfilled cyclones lose separation efficiency and dust pushes into the main hose.
- Wiggle the hose at elbows. Any cracking sounds mean the plastic is weakening and will fail soon — plan replacement.
Every 3 months, do this:
- Disconnect one 10-foot hose section and shake it or run compressed air through it to clear light buildup before blockages form.
- Inspect the vac inlet filter. A clogged filter reduces CFM by 40-60%, which drops hose velocity and causes clogs downstream. Clean or replace.
This prevents the panic moment when a clog stops your work mid-project. And that’s worth the 15 minutes of monthly attention.


Stay in the loop
Get the latest the home woodshop updates delivered to your inbox.