Why Your Belt Sander Keeps Tracking Off
Belt sander tracking has gotten less clear-cut with all the conflicting advice flying around. As someone who has spent years wrestling with drifting belts in my own shop, I picked up the practical knowledge of this problem. Today, I will share it all with you.
The belt drifts sideways. Instead of running clean down the center of the platen, it wanders toward one edge — sometimes slowly, sometimes fast enough to fold the thing over entirely. But what is a tracking problem, really? In essence, it’s a misalignment between the belt’s path and the rollers guiding it. But it’s much more than that.
Three root causes cover roughly 95% of tracking failures:
- The tracking knob is out of adjustment
- The platen is worn, crowned, or glazed with built-up debris
- The belt itself arrived stretched, warped, or defective from the factory
Most people immediately order a new belt. Meanwhile, the tracking knob — the one they’ve never once touched — is sitting right there. That’s what makes this problem so endearing to us woodworkers: the fix is usually embarrassingly simple. So, without further ado, let’s dive in.
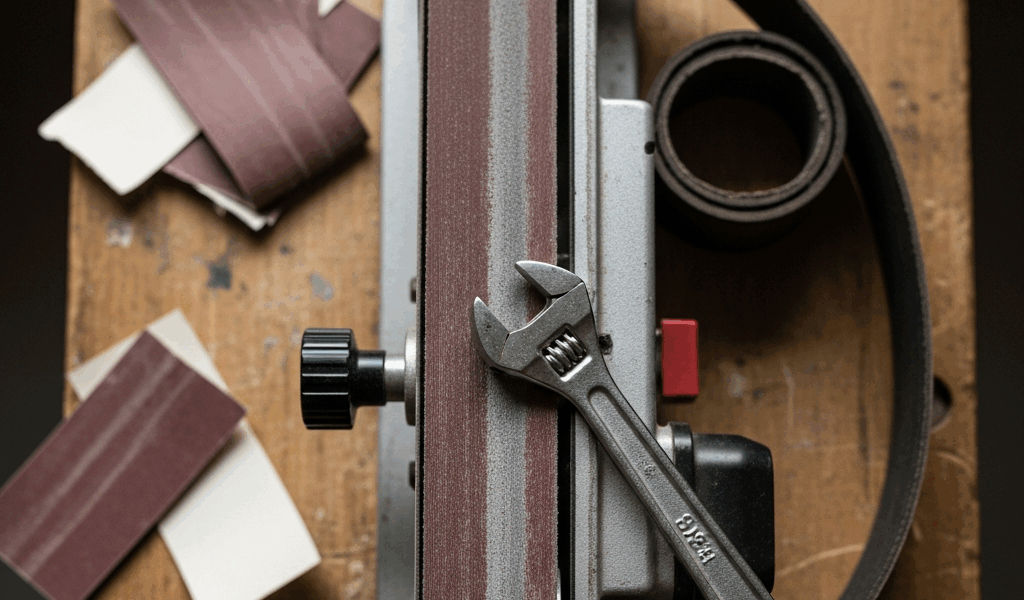
Step 1 — Check and Adjust the Tracking Knob First
Start here. Every time. Don’t repeat what I did. I replaced a perfectly good belt on my DeWalt DW433 2×42 once — paid $14 for a replacement I didn’t need — because I assumed mechanical wear rather than operator error. That was embarrassing.
Power the sander on at its lowest speed. Let it run ten seconds with no workpiece touching it. Watch where the belt goes. Creeping toward you? Drifting to the far side? Either direction is telling you something specific.
The tracking knob is usually mounted on the motor housing or along the side of the platen frame. On a Makita 9920, it’s a small ridged dial near the rear roller. On Jet and generic import machines, it might just be an unlabeled hex bolt — no markings at all. Check the manual. If the manual is long gone, the knob is almost always at the non-drive-roller end of the unit.
Turn it in small increments. I mean genuinely small — quarter-turns maximum. Run the sander three to five seconds after each adjustment and observe. The belt should center within two or three corrections. If you’re five full turns in and nothing has changed, stop. The knob isn’t your problem.
Direction logic is straightforward: turn the knob toward whichever side the belt is drifting. Belt creeping right? Adjust right. Drifting toward you? Adjust toward you. Worth mentioning before anything else — it solves things for most people before they ever need to read further.
Once the belt holds center for a full 30 seconds of uninterrupted running, you’re done. Lock the knob if there’s a locking bolt. Write down the final position. Tape a note to the machine if you have to. Future you will genuinely appreciate it.
Step 2 — Inspect the Platen and Rollers
Tracking adjustment didn’t fix it? The platen is next.
Unplug the sander. I’m apparently someone who has to remind myself of this every single time, and the habit of unplugging first works for me while rushing never does. Learn from that.
Remove the belt. Loosen the motor mount — usually two M8 bolts on most mid-range machines — and slide the motor backward to release tension. Some machines have a quick-release lever on the side. Use it if yours has one. Pull the belt off and set it on a clean surface.
Now examine the platen itself — the flat or gently curved metal pad the belt rides across. Run your palm over it first, then your fingertips. You’re feeling for:
- Shiny, glazed patches where friction and heat have hardened the surface
- Visible grooves or uneven wear running lengthwise
- Hardened resin or dust that’s baked into a coating
- A convex crown visible when you sight down the platen from the end
A slight crown is normal — necessary, even. It’s what keeps the belt centered under ideal conditions. But if the crown is visible to the naked eye without a straightedge, that’s your culprit. The belt will always drift toward the high point. Always.
Glazing is the easier fix. Hit the platen with 80-grit sandpaper or a soft brass brush, then wipe it down with a damp cloth. That hardened glaze reduces friction unpredictably and throws tracking off in ways the knob can’t compensate for. Removing it often restores everything to normal immediately.
Severe crowning or a visibly dished, concave surface? Replacement is the only real answer. Pull the part number off your model — it’s usually stamped on a plate near the motor — and source a replacement platen. Budget between $35 and $90 depending on brand. Jet and Rockwell platens tend to run toward the higher end of that range.
While you’re already in there, spin both rollers by hand. The drive roller and idler roller should both spin freely with no grinding, no clicking, no resistance. A roller that feels rough, wobbles on its axis, or stops abruptly will cause tracking drift on its own — even if everything else is perfect. Roller replacement is a separate repair and a longer job, but it’s worth knowing that’s the cause before you reassemble everything.
Step 3 — Rule Out a Bad Belt
Some belts just arrive defective. I’m apparently the kind of person who learns this the expensive way — I bought a 10-pack of generic 2×42 belts from a surplus tool vendor online, paid around $18 for the lot, and three of them had wavy edges that no adjustment could ever fix. Not a single one tracked true.
Inspect the belt before reinstalling it. Start at the seam — the glued joint where the two ends meet. Every belt has a seam bump. Run your finger across it. A pronounced ridge, something you can catch your fingernail on, will throw off belt balance and cause consistent drift to one side.
Now check the edges. Are they straight and parallel, or do they have a subtle wave along their length? Wavy edges mean the belt was either cut poorly at the factory or has stretched unevenly from heat exposure. Cheap belts do this regularly. A quality belt from Klingspor, Festool, or Mirka costs more upfront — a single Klingspor 2×42 CS310X runs around $4 to $6 depending on grit — but it runs true and actually lasts.
The definitive test: install a fresh belt from a reputable source. If tracking snaps into place immediately and holds solid through a full day of work, the old belt was the problem the whole time. Discard it. Replace your stock with something better going forward.
When Tracking Problems Mean Bigger Repairs
A handful of machines develop tracking issues from bent shafts, worn bearings, or warped housings. Less common — but real.
Symptoms that point here: the belt drifts in a different direction each time you run it, or it drifts no matter how far the tracking knob goes. Listen carefully while it runs. Grinding, clicking, or a squealing pitch that shifts with belt speed all suggest something mechanical going wrong inside.
With the belt off, spin both rollers by hand again — this time slowly and deliberately. Smooth rotation that coasts to a gradual stop on its own momentum is what you want. Rough texture, a wobble in the axis, sudden resistance at a specific point — those are internal wear signs. That’s not a field repair for most users. It’s professional service or component replacement.
Housing warps are rare. They happen after a hard drop or exposure to direct heat — left sitting on a hot surface, stored in an unventilated truck bed in July, that kind of thing. Visible cracks or a platen that won’t sit flush against a reference surface confirm it. That’s a send-it-in situation or, honestly, a reason to replace the unit entirely.
Most people reading this will solve everything in Step 1 or Step 2. Work through the sequence in order, don’t skip ahead, and you’ll fix it the first time — without buying parts you don’t actually need.


Stay in the loop
Get the latest the home woodshop updates delivered to your inbox.