Table Saw Kickback Has Shifted noticeably with all the Generic Safety Warnings Flying Around
As someone who’s been woodworking for twelve years, I spent real time learning the ins and outs of the specific, stomach-dropping moment when a piece of wood becomes a projectile. I witnessed it exactly once in person. A four-inch-wide poplar board — maybe $3 worth of lumber — shot backward at roughly 60 mph and hit the guy’s chest guard dead center. He was fine. He was wearing one. Today, I will share it all with you, because most articles on kickback tell you to buy a riving knife and call it a day. That’s not diagnostics. That’s a sticker on a band-aid.
But what is table saw kickback? In essence, it’s when the workpiece suddenly reverses direction and fires toward you at dangerous speed. But it’s much more than that. The physics is simple enough — wood gets grabbed by the blade’s rear teeth and accelerated backward. The blade is stronger than you are, full stop. What actually matters, though, is why the wood got grabbed at all. That answer depends entirely on which of four distinct failure modes is wrecking your setup.
The four main causes:
- Wood closing in on the blade from internal stress relief
- A misaligned fence pushing the workpiece into the blade
- A dull or wrong blade demanding excessive feed pressure
- Operator positioning and feeding habits that guarantee a catch when anything stalls
Most people lump all of this under “bad safety habits” and move on. Backwards. Each one is a mechanical or material problem with a specific, measurable fix. Learn to diagnose which failure is actually happening, and kickback stops feeling like an act of God and starts feeling like what it is — a machine malfunction.
Wood Pinching the Blade Mid-Cut — When the Material Itself Is the Problem
Wood holds internal stress. You’ve probably seen this already without knowing what you were looking at — rip a board and watch the two halves curl away from each other like they’re relieved to be apart. That curl is real tension, locked inside the grain since the tree was standing.
When you make a rip cut, you’re releasing some of that tension. The kerf is essentially a wound, and the wood wants to close it. If closing happens on the blade side while you’re still feeding — that’s the catch. The blade can’t move. It’s still spinning. The workpiece stops going forward and starts going backward instead. Fast.
This happens most with green lumber, which hasn’t dried and carries enormous internal stress. Also shows up on wide rips, thick hardwoods, and boards milled with built-in tension. You’ll recognize those last ones — they’re the ones that curve the instant you crosscut them in half. The wood isn’t abstractly problematic. This particular piece has stress you didn’t account for. That’s a different problem, and it has a different fix.
Important part first.
The fix runs two directions. First: a riving knife or splitter. Here’s the distinction — a riving knife is fixed to the saw’s body, sitting just behind the blade, and prevents the kerf from closing on either side of the blade. A splitter is a removable plate that rides in the kerf after the cut has started. Both work. A riving knife is more reliable because it can’t be installed wrong or left in the truck. Make sure yours sits approximately 1/16 inch clear of the blade body and extends to roughly the same height as the top of the blade. Too low and it accomplishes nothing. Too high and it starts interfering with normal stock. My saw is a SawStop Jobsite, and their manual is indexed by serial number on their website — yours probably is too.
Second fix: respect the material. If a board curves visibly when you crosscut it, don’t rip it alone. Grab someone to help guide the offcut, run a featherboard, feed slowly. Tension relief is invisible right up until it isn’t. Slow feeding buys you reaction time. That’s not nothing.
Fence Alignment and How It Pulls Wood Into the Blade — A Mechanical Problem You Can Actually Measure
Your fence controls where the blade contacts the wood at every point along the cut. If the fence isn’t parallel to the blade, the wood doesn’t pass the blade — it gets driven into it. Measurable. Fixable. Not vague at all.
Fence alignment problems come in two types: toe-in and toe-out. Toe-in means the front of the fence sits closer to the blade than the back does. Toe-out is the reverse. Toe-in is the dangerous one — it forces the wood into the blade as you feed forward. The geometry is relentless. Doesn’t matter how careful you are. Toed-in fence, and you’re feeding into a trap every single cut.
Checking takes five minutes. Raise the blade to full height, unplug the saw — non-negotiable — then take a metal ruler or machinist’s square and touch the blade teeth at the front. Note the gap. Move to the back of the blade, measure again. Same gap both ends means you’re parallel. Back gap smaller means toe-in. Back gap larger means toe-out.
Most modern saws have adjustment bolts at the fence’s rear casting. Loosen them slightly — don’t pull them out — and tap the fence body with a deadblow hammer or a spare chunk of wood until both measurements match. Tighten. Check again. Takes patience, not skill. If your saw runs shims instead of bolts, you’ll add thin shims under the fence rail mount to bring it parallel — the manual specifies which side. If the fence itself is bent — I’ve seen this on older Craftsman saws from the mid-90s — shims can’t save you. Bent fences get replaced, not coaxed.
I’m apparently over-cautious about this particular thing, and checking fence alignment twice a year works for me while ignoring it never did. Check it after every time you move the saw. Check it if someone else has been using it. A 1/16-inch toe-in across the length of a 27-inch table is enough to cause a catch. The fence looks perfectly fine. It sits flat. You’d never know unless you measured.
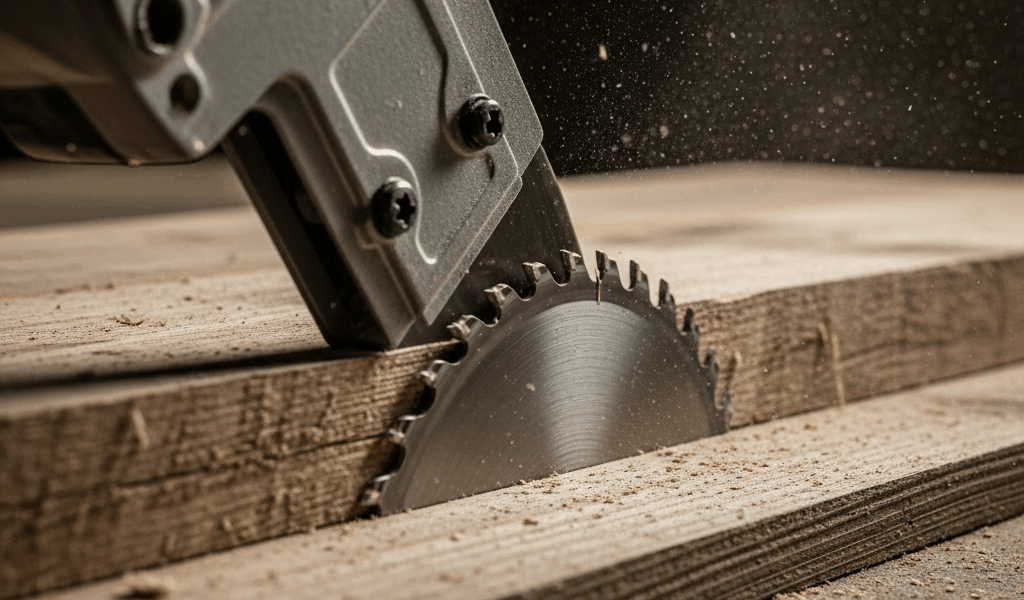
Blade Problems That Make Kickback More Likely — Not Just Dull, But Wrong
Dull blades mean more feed pressure to push the cut. More pressure equals more friction. More friction equals a higher chance the workpiece stalls. Stalled workpiece against a spinning blade — that’s exactly the setup for a catch. Save yourself the trouble I had of running a blade two months past replacement and wondering why the saw felt sketchy.
But dullness isn’t the whole story. Blade selection matters just as much. A crosscut blade typically runs 80 teeth; a rip blade runs 40. Those extra teeth exist to sever wood fibers cleanly across the grain. On a rip cut — splitting along the grain — all those teeth create friction instead of cut. You’ll slow your feed, generate heat, and climb toward stall risk every time.
Flip it around: using a 24-tooth rip blade to crosscut 3/4-inch plywood tears out sections. The large gullets between rip teeth can’t handle the shearing action, and the workpiece can rotate or catch unpredictably.
Standard breakdown: 40-tooth combination blade handles hardwood rips like oak and maple without drama. Softwoods tolerate 30 teeth. Sheet goods and plywood want 60 to 80 teeth — you’re cutting through veneers, not splitting grain. Kerf width matters too. Standard kerf runs .125 inch. Ultra-thin kerf sits around .090 inch and loads the motor less — good on underpowered contractor saws. That’s what makes blade selection endearing to us table saw obsessives: the details actually change the outcome.
Blade chattering during a rip cut? Check tooth count before assuming it’s dull. Wrong tool, wrong job. Swap the blade, and the problem frequently evaporates entirely.
Operator Habits That Reduce Kickback Risk — Standing Right, Feeding Right, Holding Right
This isn’t a safety lecture. This is technique. The difference is that technique comes from understanding the mechanics, not from fear of the machine.
Where you stand is a geometry problem. Stand offset from the blade’s travel line — to the side, not directly behind the workpiece. If kickback happens, the workpiece travels backward along the exact line of blade rotation. You don’t want to be on that line. This isn’t paranoia. It’s just knowing where the dangerous direction is and not standing there.
Push sticks and push blocks aren’t interchangeable — that distinction matters. A push stick is a thin piece of hardwood, notched at the end, roughly 18 inches long. Good for driving the workpiece forward through the majority of a rip cut. A push block has a vertical wall that contacts the side of the workpiece, pressing it against the fence and down onto the table simultaneously. Use the push block for the last six inches of a rip, when your fingers would otherwise get close to the blade. Use the push stick for everything before that.
Featherboards are the tool people skip and then regret skipping. A featherboard — either store-bought or cut from scrap with a bandsaw, thin kerfs every 3/8 inch — presses the stock against the fence with consistent, passive pressure as it feeds. Mount one on the table surface, ahead of the blade. Mount another on the fence body. The wood literally cannot drift into the danger zone. That’s how you remove a failure mode instead of just hoping you catch it in time.
Never reach behind a running blade. The temptation happens when a short offcut comes free and slides toward the back of the saw. Let it slide. Let it fall. Your hand costs more than the scrap. Full stop.
Feed speed has a feel to it — the saw sounds different when it’s cutting clean versus when the motor is bogging or when you’re moving too slow and just heating the wood. Find that sound. It’s the blade working without struggling. Stay there. So, without further ado, go check your fence alignment before your next rip cut. That one step alone eliminates the most common cause of kickback I’ve ever heard described secondhand — and it takes five minutes with a metal ruler.


Stay in the loop
Get the latest the home woodshop updates delivered to your inbox.