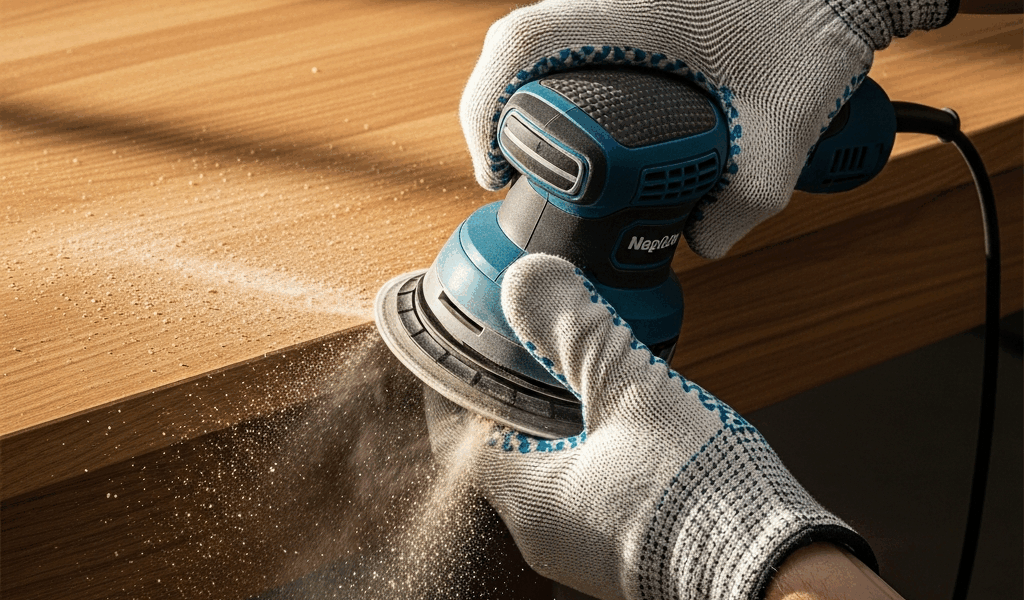
For most furniture refinishing, the best first power sander is a 5-inch variable-speed random-orbit sander connected to effective dust extraction. It works efficiently on broad, flat solid-wood surfaces without the strongly directional scratch pattern of a basic finishing sander. It is not the right tool for every inch of a piece: use a detail sander or shaped hand-sanding block for corners, a scraper or hand sanding for moldings, and extreme restraint on veneer. A belt sander is a fast stock-removal tool—not the default furniture-refinishing choice.
The right answer depends more on the surface than on the brand. Before plugging in a sander, identify the substrate, determine whether the existing coating could be hazardous, and decide whether the finish actually needs to be removed.
Best furniture sander at a glance
| Job | Best starting method | Why | Main risk |
|---|---|---|---|
| Solid-wood tabletop or dresser top | 5-inch random-orbit sander | Fast, versatile and relatively forgiving with good technique | Swirl marks, rounded edges and uneven removal |
| Chair legs, spindles and profiles | Hand sanding with shaped blocks or abrasive pads | Conforms to curves without flattening details | Changing the profile by oversanding |
| Inside corners and narrow recesses | Detail sander or careful hand sanding | Reaches areas a round pad cannot | Digging in at the triangular pad tip |
| Thin veneer | Scraper or very light hand sanding after testing | Maximum control over a thin decorative surface | Sanding through to the substrate |
| Large, flat solid stock with heavy damage | Belt sander only when experienced | Removes material very quickly | Deep grooves and irreversible material loss |
| Scuffing a sound finish before recoating | Fine hand sanding or finishing sander | Creates adhesion without stripping the piece | Unnecessarily cutting through the existing finish |
Inspect the furniture before sanding
First determine whether the piece is solid wood, veneered sheet material, laminate or a mixture. Look at the underside and edges, inspect repeating grain patterns, and check chips or damaged corners. Many tabletops and case pieces use a thin face veneer over plywood or composite material. Once that veneer is sanded through, ordinary refinishing cannot restore it.
Next decide whether stripping is necessary. A sound finish may only need cleaning, deglossing and a compatible recoat. Thick paint, intricate carvings or multiple finish layers may respond better to a suitable chemical stripper than aggressive machine sanding. Follow the product label, provide the specified ventilation and personal protective equipment, and keep solvent-soaked materials away from heat and ignition sources.
Random orbit, palm, detail or belt?
Random-orbit sander: the best general choice
A random-orbit sander combines rotation with an offset orbit, which helps disguise directional scratches. Look for variable speed, a pad brake, a comfortable grip and a dust port that can connect securely to a vacuum or extractor. Abrasive holes should align with the pad. Better dust removal improves visibility, reduces airborne dust and helps prevent loose particles from creating pigtail scratches.
Use the sander flat. Start it on the surface if the manual directs, guide it slowly with overlapping passes, and apply only light pressure. Pressing down slows the random action, generates heat and can deepen scratches. Keep the pad moving and allow it to stop before setting it down or lifting it if that is what the tool manual specifies.
Finishing or palm sander
A sheet-style orbital finishing sander removes material more slowly and can work well for light scuff sanding and final surface preparation. Its square pad reaches closer to inside corners than a round random-orbit pad, though it still cannot safely follow every molding. It is not automatically “finer”; abrasive grit and technique still determine the scratch pattern.
Detail sander and oscillating multi-tool
A triangular pad reaches corners and narrow spaces. Use it briefly and keep the entire pad supported when possible—the pointed tip can carve a hollow quickly. An oscillating multi-tool with a sanding attachment is useful for access, but its small pad is inefficient for broad panels.
Belt sander
A handheld belt sander can flatten large solid-wood surfaces or remove severe damage, but it removes material far faster than most furniture projects require. It can gouge a tabletop in seconds, round an edge or erase a veneer. If the piece is valuable, thin, shaped or unfamiliar, choose a slower method.
Hand sanding and scraping
Hand tools are not merely for cleanup. A sharp card scraper can remove a brittle finish or level local defects with less dust and more control. Cork, rubber and custom-shaped blocks keep abrasive pressure even. Abrasive pads conform to turnings without flattening crisp details. Always work with the grain for the final hand-sanding passes.
Choose a grit sequence from the surface
There is no universal “80, 120, 220” recipe. Start with the finest grit that efficiently removes the defect or old coating. Coarse abrasive is appropriate for deep damage on sufficiently thick solid wood; it is excessive for a thin veneer or a surface that only needs deglossing. After the initial cut, progress through intermediate grits so the next abrasive can remove the previous scratch pattern. Avoid large jumps.
- Heavy defects on solid wood: a coarse starting grit may be justified, followed by one or more intermediate steps.
- Normal finish removal or leveling: begin in a medium range after a test patch and increase only if progress is unreasonably slow.
- Sound finish before recoating: use the coating maker’s specified preparation rather than stripping to bare wood.
- Final bare-wood grit: follow the stain or finish manufacturer’s instructions. Sanding too fine can reduce absorption of some penetrating finishes.
Vacuum between grits and inspect under low, raking light. Pencil marks can help show whether passes are even, but remove them completely. Do not wet-sand bare wood by default: water can raise grain and alter the process. Wet sanding is a specific finishing technique used only when the abrasive and coating system permit it.
A safe, repeatable refinishing workflow
- Identify the material and coating. Check for veneer, repairs, laminate, valuable patina and possible lead paint.
- Remove hardware and clean. Dirt and wax can clog abrasive and contaminate the new finish. Use a cleaner compatible with the surface.
- Make a test patch. Work in an inconspicuous area using the least aggressive method.
- Stabilize the piece. Support it so it cannot rock. Remove loose clothing and jewelry, and keep hands away from moving abrasive.
- Control dust at the tool. Connect extraction, align pad holes and empty the collector safely. OSHA identifies sanding dust as a health hazard and favors engineering controls such as local exhaust.
- Sand flats before details. Keep the pad flat, overlap passes and avoid dwelling at edges.
- Switch to hand methods. Treat corners, profiles and veneer with shaped blocks, pads or a scraper.
- Inspect between grits. Remove dust, use raking light and do not advance until the previous scratches and defects are gone.
- Clean for finishing. Vacuum the work and surrounding area. Follow the finish maker’s directions for final cleaning, grit, temperature and recoat timing.
Dust, PPE and fire precautions
Sanding creates fine airborne particles. OSHA notes that wood dust can cause respiratory and skin effects and that some exposures are associated with cancer. Capture dust at the source with a fitted vacuum or extractor, ventilate appropriately and avoid blowing accumulated dust into the air with compressed air. Eye and hearing protection may be needed. Respirator choice depends on the material, coating and exposure; follow the product safety data and current occupational guidance rather than treating a disposable mask as universal protection.
Keep dust away from flames, sparks and hot equipment. Fine wood dust and many finishing products are combustible. Separate sanding from solvent use and spray finishing, maintain extraction equipment as directed, and dispose of oily or solvent-contaminated rags according to the product label and local fire guidance.
How to prevent orbital swirl marks
- Use clean, undamaged abrasive and replace it when loaded or torn.
- Match abrasive holes to the pad and keep extraction working.
- Do not bear down; let the abrasive cut.
- Guide the tool slowly in overlapping passes without tilting it.
- Remove loose grit before moving to a finer abrasive.
- Inspect every grit under raking light rather than discovering scratches after stain.
If dust collection is deteriorating, diagnose the hose, port, abrasive alignment and filter before continuing. Our guide to orbital-sander dust collection problems covers that workflow, while the orbital swirl-mark guide focuses on scratch diagnosis.
Furniture-specific examples
Tabletop
Confirm that the top is solid wood or determine the veneer thickness. On sound solid wood, use a random-orbit sander for the main field and a block near edges. Keep the pad flat and preserve edge geometry. On veneer, begin with a test patch and favor a scraper or light hand work.
Chair or turned legs
Use abrasive strips, flexible pads and shaped blocks. Avoid flattening beads and coves. A detail sander can help on broad seat corners, but hand work gives more control around joints and turnings.
Painted dresser
Assess lead risk before disturbing the coating. If it is safe to proceed, decide whether the paint must come off or merely needs a compatible scuff and recoat. Machine sanding is not automatically the fastest or safest way to remove multiple paint layers.
Frequently asked questions
What is the best sander for refinishing furniture?
For broad, flat solid-wood areas, a 5-inch variable-speed random-orbit sander is the most versatile starting choice. Add hand-sanding blocks or a detail sander for corners and profiles. Treat veneer with slower, more controlled methods.
Can I use a belt sander on furniture?
Only selectively. It can be useful for severe defects on large, flat, thick solid wood, but it is easy to gouge the surface or sand through veneer. It should not be the default tool for a dresser, chair or veneered tabletop.
Should I sand furniture to 220 grit?
Not automatically. The correct stopping grit depends on the wood, whether the surface is bare or coated, and the finish manufacturer’s instructions. Over-sanding can reduce stain absorption, while stopping too coarse can leave visible scratches.
Can I sand old painted furniture indoors?
Do not begin until you understand the coating and lead risk. Even ordinary wood and finish dust require source capture and cleanup; possible lead paint requires specific containment and lead-safe practices. Consult current EPA guidance or a certified professional.
Authoritative safety references
- U.S. EPA: Lead-Safe Renovations for DIYers
- OSHA: Wood Dust overview
- OSHA: Wood Dust—Possible Solutions
- OSHA: Woodworking Fire and Explosion Hazards
Last reviewed August 2026. Tool manuals, coating labels and local safety rules control for your specific project.



Stay in the loop
Get the latest the home woodshop updates delivered to your inbox.